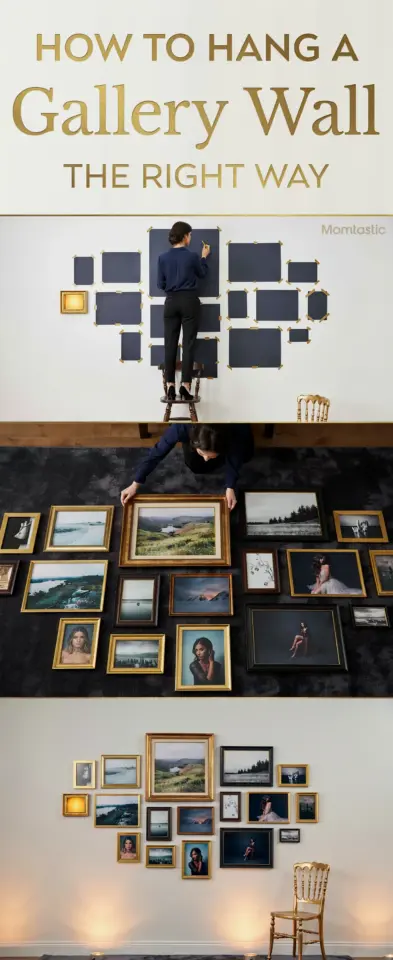
Start With a Blank Wall and a Plan
If you have a bare wall in your small living room and zero clue where to start, you are not alone. A DIYGalleryWall sounds fancy, but it is really just arranging a few pieces of art in a way that looks intentional. I have done this three times in my own tiny apartment, and each time I spent less than $40. The trick is to treat it like a puzzle, not a design project. Start by measuring your wall space. A good rule is to keep the gallery roughly centered at eye level. For a small living room, aim for a cluster that is about two feet tall and three feet wide. That size is big enough to make a statement but small enough not to overwhelm the room.
How to Plan Your Gallery Wall Layout
Gallery wall layout planning is the step most people skip, and then they end up with crooked frames and extra nail holes. Take a piece of wrapping paper or a large cardboard box and cut out rectangles to match your frames. Tape these paper templates on the wall and move them around until the arrangement feels balanced. Start with one central piece (the largest or boldest item) and work outward. If you are unsure, stick to a symmetrical grid: two rows of three frames each. That is the easiest way to get a polished look without much guesswork. For a more relaxed vibe, try an asymmetrical layout where the outer frames hug the center piece like a loose frame. I personally prefer asymmetry because it hides small mistakes in spacing.
Thrifted Frames and Printable Art Ideas
You do not need to spend a fortune to get a designer look. Thrifted frames and printable art ideas are your best friends. Hit up garage sales, flea markets, or thrift stores for old frames. Look for solid wood or metal frames with clean lines. Even if the frame has ugly artwork inside, just toss that and keep the frame. Spray paint them all one color (matte black or white works every time) for instant cohesion. For the art itself, search for free printable art on sites like Unsplash, or buy a cheap bundle on Etsy for a few dollars. Botanical prints, minimalist line drawings, and black and white photography look expensive but cost nothing. Print them on standard copy paper and trim to size.
- Check thrift stores for frames with no glass damage – glass is expensive to replace.
- Use the same color spray paint on all frames to unify mismatched finds.
- Print art at home or at a library for under $1 per sheet.
- Mix in a small mirror or a fabric piece for texture without spending extra.
Mix Frame Sizes and Colors for a Cohesive Look
Many beginners think every frame has to match. Wrong. Mixing frame sizes and colors is what gives a gallery wall that collected-over-time feel. Stick to two or three frame colors maximum. For example, you can use black frames for the main pieces, one gold frame as an accent, and maybe a natural wood tone for warmth. When it comes to sizes, vary them: a large 11×14 piece, a couple of 8x10s, and a few small 5x7s. Balance the heavy pieces across the layout so one side does not visually sink. I once used a large black frame with a white mat, a thin gold 5×7, and a chunky dark wood square – they looked totally different but worked together because the colors repeated across the wall.
No Nail Gallery Wall Arrangement for Renters
If you rent or hate fixing holes, try a no nail gallery wall arrangement. Use command picture hanging strips. They hold frames up to 20 pounds and come off clean. The key is to follow the instructions: wipe the wall with rubbing alcohol, press the strip firmly for 30 seconds, and wait an hour before hanging. I have used them for two years without a single frame falling. Another renter-friendly trick is to lean frames on a shelf or a mantel instead of mounting them. In a small living room, leaning art against the wall above a low console table creates the same visual effect without any damage. You can also prop a large frame on the floor behind a sofa – it looks intentional and costs zero installation time.
Gallery Wall in a Small Living Room: Spacing and Scale
Gallery wall in small living room spaces needs careful spacing. Too much gap between frames makes the wall look sparse; too little makes it cluttered. I keep 2 to 3 inches between frames for a tight, modern look. If your frames are very ornate, bump it up to 4 inches so they do not fight each other. Scale down your art if your wall is tiny. A single large piece can work better than ten small ones in a cramped area. For a 6-foot-wide wall, three medium frames staggered look right. Remember that your furniture matters too: the bottom edge of the gallery should be about 6 to 8 inches above the back of your sofa or console table. That keeps the whole arrangement connected to the room instead of floating.
Budget Friendly Personal Gallery Wall Touches
To make the wall feel like yours, add a couple of personal items without spending more. Tuck in a postcard from a trip, a handwritten quote on nice paper, or a child’s drawing in a simple frame. You can
#DIYGalleryWall #GalleryWallIdeas #WallArtDecor #BudgetArt #HomeDecorDIY
Leave a Comment