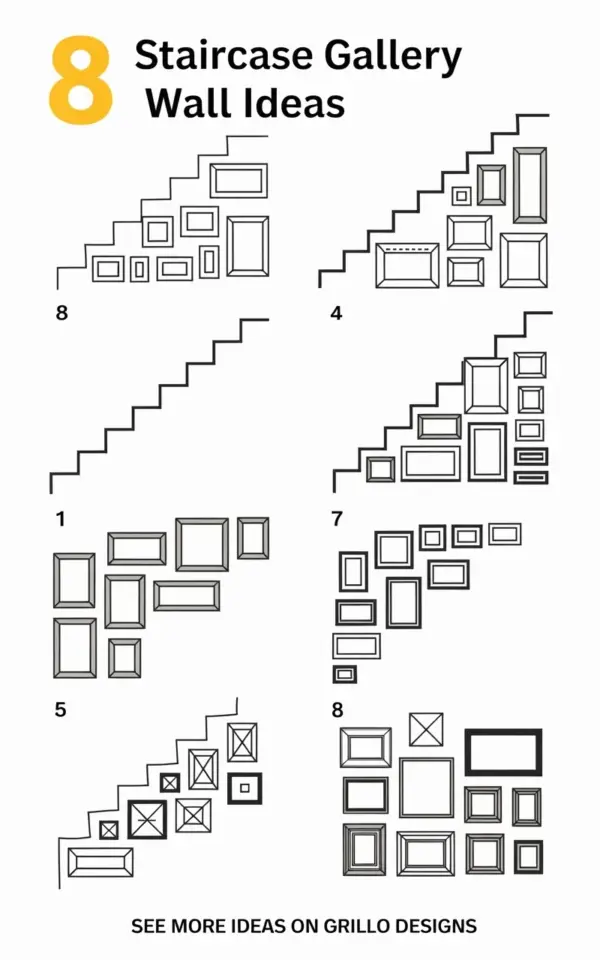
There’s a particular moment in every stairway project when you’re standing at the foot of the steps, holding the first frame, and you suddenly realize you have no idea where it goes. That’s exactly when a staircase gallery wall layout becomes your best friend. The illustration people keep sharing on Pinterest shows eight different ways to arrange frames along a set of stairs, with black wavy lines doing the job of the railing and a big yellow “8” hovering above the title. Honestly, it looks simple. But it took me years of hanging and rehanging frames to understand why those little diagrams work so well.
Mistake #1: Starting With a Frame Instead of a Plan
Most people pick out one piece they love, buy it, bring it home, and then try to build the whole wall around it. That’s backwards. The wall itself is the design element, not the frame. In the illustration, each of the eight layouts starts with a group of rectangles that have been measured as a single composition, not a collection of favorites.
Before you buy anything, trace the entire stairwell on a piece of paper. Measure the height of the wall from the top of the steps to the bottom, then mark where the stairs end. The drawing on Pinterest does this visually, with the staircase as a black line and every frame sitting at a different height along it. You can copy that logic without being an artist. Just map the big shapes first.
Mistake #2: Ignoring the Step Angle
Look, the number one thing people get wrong is trying to hang frames parallel to the floor on a stairway. A stair is a slope, so your eye naturally expects the art to follow that same diagonal rhythm. Every one of the eight layouts in that image works because the frames step down along an invisible line that mirrors the stairs themselves.
You don’t need a laser level or a protractor. Just eyeball the angle of your steps and imagine a line running through their middle. Now place your biggest frame so its bottom edge sits just above that imaginary line. The next frame goes lower, and the one after that goes lower still. The whole arrangement should feel like it’s walking down the stairs with you.
Mistake #3: Hanging Everything at the Same Eye Level
I get why people do it. It feels safe to align the center of every frame at 60 inches off the ground. But on a stairway, that creates a weird, squared-off cluster that fights against the architecture. The frames in the illustration are all over the place vertically, and that’s the point.
Think of this less like a gallery wall and more like a mobile. Each frame takes its cue from the step below it. One time I spent an entire afternoon moving a single frame three inches six different times. My back still remembers. But the difference between even four inches and six inches along a stair line is enormous.
Mistake #4: Using Frames That Are All the Same Size
Here’s the thing: a row of identical 8x10s on a stairway looks like an office hallway, not a home. The illustration works so well because each layout mixes rectangles of different proportions. There’s a big square next to a tall skinny one, then a small landscape piece, then another big one.
Start with the largest piece and work your way down the stairs, just like the Pinterest description says. That big frame anchors the entire composition. Then let the smaller frames trail behind it like a conversation. Vary the colors too if you’re feeling bold. Black and white prints with one pop of color, or all wooden frames with one brass accent, both work.
- The golden rule: make sure every frame shares at least one visual detail, a similar mat color, a matching frame profile, or even just the same glass reflection.
- Then break that rule for one single frame. That’s the one people will stop on the stairs to look at.
Mistake #5: Forgetting About the Handrail and the Wall Width
Your staircase gallery wall layout has to live in the real world, with real handrails, light switches, and weird wall angles. The wavy staircase line on the left of the illustration is a good reminder that the stairs themselves take up space in your layout. But people forget to account for the physical hardware attached to the wall.
Measure the gap between your handrail and the top of the stairwall. If it’s less than four inches, don’t try to squeeze frames in there. Instead, start your layout above the handrail and let the frames ride the same slope from a higher starting point. Also, if your stairs have a landing, treat it as a natural break. Let one cluster end at the landing and start a fresh one above it.
How to Actually Copy the 8 Layouts in the Illustration
Ok so the illustration gives you eight different configurations, but they all follow the same basic process. Use paper templates taped to the wall before you hammer a single nail. Cut out exact-size rectangles from kraft paper or newspaper, then move them around until you get a stair-step rhythm you like. Two words. Tape and paper. That’s all you need.
The eight layouts in the drawing all share a few structural patterns: they use an odd number of frames, they keep the negative space between frames consistent, and they always have one visual anchor. When you find the one that feels right, take a photo of it with your phone, stand back, stare at it for a full day, and then commit. Mark the hanging points for your nails by pressing a thumbtack through the paper corners.
Here’s the process that works every time, no matter which layout you choose from the image:
- Tape paper templates to the wall in the diagonal arrangement you like.
- Stand on the stairs and check the spacing from both eye level and a lower angle.
- Remove the templates one at a time and hang the frame with a nail or picture hook.
- Step back after every single frame. Don’t hang two in a row without looking.
Once the frames are up, resist the urge to keep adjusting them. The beauty of the layout from that illustration is that it’s meant to feel a little free, a little organic. The frames don’t need to be perfectly level with each other, they need to be level with the stairs themselves.
If you’ve been avoiding a staircase gallery wall because you were afraid you’d mess it up, this is your sign to just try it. Start with five or six frames you already own, even if they’re not a perfect set. Lay them out on the floor in a stair-step pattern, measure twice, and give your stairway the one thing it’s been missing. Real personality. You can always rehang it next season.
Leave a Comment