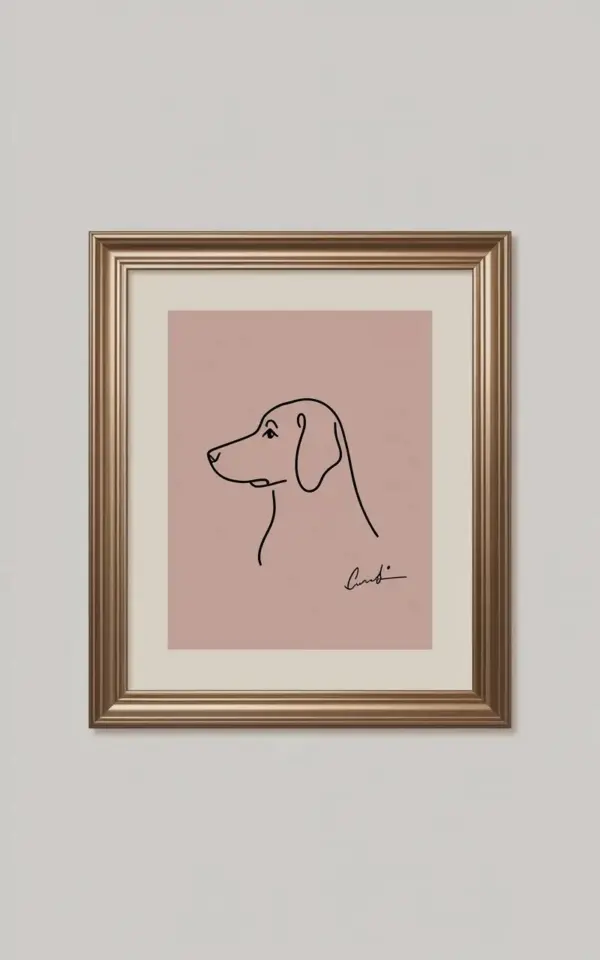
There’s a specific kind of satisfaction in walking past a framed print that cost you under ten dollars and thinking, “I made that.” The budget-friendly minimalist dog art in gold frame trend is exactly that, and honestly it’s one of the easiest ways to fill a blank wall without blowing your paycheque. I’ve been staring at this exact dusty rose dog portrait on my own living room wall for weeks, and it still makes me grin.
The photo that started this whole thing shows a simple line drawing of a dog’s head in profile, facing left, done in thin black ink on dusty rose paper. It’s tucked into a heavily ornate gold frame with multiple beveled edges, matted like a piece from a fancy gallery. Except it’s not. It’s a Sharpie, some scrap paper, and a frame I rescued from a church sale for three dollars.
Why Minimalist Dog Art Works in Almost Any Room
Minimalist dog art has this weird ability to feel both personal and classy at the same time. A detailed oil painting of a Labrador can look dated, but a few clean lines on a colored background just reads as intentional. You can hang it in a bedroom, a hallway, even a home office, and it won’t clash with whatever else you’ve got going on.
The line drawing itself is the real star. It’s not trying to capture every hair or muscle. The ear, the snout, the basic shape of the skull, that’s enough. It leaves something to the imagination, which is a lot more interesting than a photorealistic print that doesn’t match your other decor.
And that gold frame does a lot of the heavy lifting. The contrast between the ornate, old-fashioned frame and the modern, offhand drawing is the whole trick. If you put this same line art in a plain black frame, it would be forgettable.
The Thrift Store Frame Trick (and How to Choose One)
Here’s the thing: you don’t need to spend money on a new frame. Thrift stores, estate sales, and Facebook Marketplace are full of perfectly good frames that people are practically giving away. The trick is to look at the shape and the colour, not the art inside.
Bring a measuring tape. You’re looking for a frame where the inner opening is around 8×10 inches, or maybe 11×14 if you want more breathing room. The ornate gold style is ideal, because it adds that collected, antique feel without you having to age it yourself. If the glass is scratched or the backing is falling apart, don’t worry. You can replace the backing with a piece of cardboard and swap the glass if you really need to.
Just make sure the frame sits flat against the wall. Some thrifters have crooked frames that wobble, and that’ll drive you crazy.
Dusty Rose Paper and a Sharpie: The Whole Supply List
Ok so here’s what you actually need, and it’s not much:
- One sheet of paper in a muted colour like dusty rose, dusty blue, or even a pale peach. Pick a shade that won’t fight with your wall colour.
- A black fine-tip Sharpie or any permanent marker. The ultra-fine point gives you nicer control for those thin lines.
- A thrifted gold frame with the glass removed (or kept, if it’s clean).
- A ruler or a straight edge, only if you feel nervous about keeping your lines steady.
- A piece of acid-free tape or some mounting putty to hold the paper in place.
That’s it. No special pens, no art supplies, no printer. Honestly, the whole project costs less than a fancy latte, and the result looks like it came from a shop that charges eighty dollars for a poster.
How to Draw a Simple Dog Profile (Even If You Can’t Draw)
I am not a naturally talented artist, so trust me when I say this is achievable. The secret is to start with the shape of the head, not the details. Draw a gentle curve for the forehead, then a slightly bent line for the snout, and then pause. You’re looking for the overall silhouette before any features go in.
The ear is the defining moment. For a dog facing left, the ear can be a soft triangle that drops down, or a pointy shape sticking up, depending on the breed. Keep the lines smooth and light first, then go over them once with the Sharpie once you’re happy with the placement.
Add the eye as a simple dot or a small curved line, and do the same for the nostril. That’s honestly enough. The signature in the bottom right corner is what sells the whole thing. Write your initials, a small date, or even a little doodle there. It makes it look like a real artist signed it, because you did.
One odd piece of advice: practice once on a scrap piece of paper first. Not because you’ll ruin anything, but because you’ll loosen up. Your second dog will always look better than your first.
Other Budget-Friendly Wall Decor Ideas That Match This Vibe
Once you’ve nailed this dog art technique, you can apply it to other subjects. A minimalist line drawing of a cat, a single flower stem, even a simple mountain range, all work in the same gold frame. The formula is the same: a clean line on a coloured background, matted generously, framed in something old and fancy.
If you want a whole gallery wall, collect a few different frames from thrift stores and paint them all the same shade of gold. That instantly makes a mismatched collection look intentional. Or keep one tiny frame with a single line drawing and let it sit on a bookshelf propped up against some books, which is a nice low-commitment option.
The matting is another chance to save money. Instead of buying a custom mat, buy a pack of pre-cut mats from a craft store. They come in standard sizes and cost a fraction of what a frame shop charges. Just cut a piece of coloured paper to fit behind the mat, and you’re done.
How to Hang and Style Your New Artwork
Hanging this correctly matters more than you’d think. Since the art itself is small, you want to hang it at eye level, not up near the ceiling. Measure from the floor to the middle of the frame, and aim for around 57 to 60 inches. That’s the standard gallery height, and it works for a reason.
Use two nails or two picture-hanging hooks rather than one in the middle. The frame will stay level, and you won’t be constantly adjusting it. If you’re putting it above a console table or a couch, leave about 6 to 8 inches of breathing room between the bottom of the frame and the furniture below.
The light gray wall in the original photo makes the dusty rose paper pop softly. If your wall is white, consider adding a small accent lamp nearby so some warm light hits the gold frame. That’ll give it the same cosy glow without any expensive lighting setup.
A Few Things I Learned the Hard Way
First, check the back of the frame before you buy it. Some old frames have those little metal tabs that can be bent back and forth, but the tabs break off after a few attempts. If that happens, you’ll need to tape the backing on, which is doable but annoying.
Second, don’t press hard with the Sharpie. I did that on my first attempt, and the ink bled into the paper, making the lines look shaky and rough. Light, repeated strokes are your friend. You can always make lines darker, but you can’t undo a blotch.
Third, let the artwork sit for a minute before you frame it. If you close the frame immediately, the ink can smudge against the glass. Give it at least five minutes to dry. I once had to pull a ruined drawing out of a frame and start over because I didn’t wait.
Also, that dust collecting on the mat? It’s a real problem. Use a dry microfiber cloth and gently wipe the mat down before you tighten the frame. Your future self will appreciate it.
So here’s where I’ll leave you. The next time you’re in a thrift store and you spot a garish gold frame, don’t walk past it. Grab it, take it home, and give it a second life with a cheap piece of paper and a marker. You won’t regret it.
If you make your own version, I’d honestly love to see it. Drop a comment below with a photo of your wall decor, or tag me in your next cosy home refresh. Happy hanging.
Leave a Comment