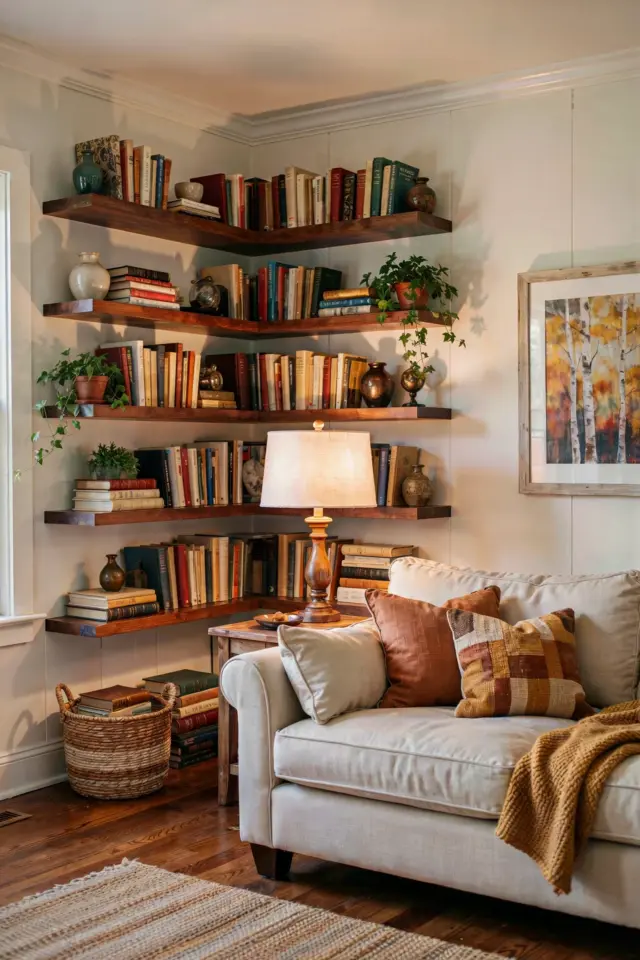
I wanted a warm, cozy gallery wall without spending a fortune. So I picked up some cheap floating shelves from the hardware store and painted them myself. Mixed thrifted frames with free printable art, plus a few plants for life. It’s my favorite corner now and cost under $50 total! 💛 Try styling yours beside the sofa. #FloatingShelves #GalleryWall #NeutralHomeDecor #CozyLivingRoom #BudgetDIY
Honestly, I didn’t plan it. I was standing in the paint aisle holding a sample card that definitely wasn’t the right beige (too pink, if you must know) and I just grabbed two raw wood shelves from the clearance rack. They were like six bucks each. That started the whole thing. Look, you don’t need a big renovation to make a corner feel intentional. You just need a few cheap shelves, some frames you aren’t afraid to paint over, and maybe a little patience with a level.
Let me walk you through exactly what I did. Step by step. No fluff.
Start With the Right Floating Shelves
Not all floating shelves are created equal. I grabbed the plain pine ones from the hardware store, the kind that come with a hollow core and a metal bracket you screw into the wall. They were fine. But I sanded them down because the edges were rough, honestly felt like splinter city. Then I painted them the same matte white as my trim. That was a happy accident. They sort of disappear into the wall, so the art feels like it’s floating.
Thickness matters more than you think. Thicker shelves (at least 1.5 inches) look sturdy and hold books without bowing. Thin shelves look cheap. Ok so rule of thumb: if you can push on the front edge and it wobbles, it’s too flimsy. I also measured twice before drilling. There’s nothing worse than a crooked shelf that you have to patch and redo. Take it from me, I have three little holes above my living room window that I still haven’t fixed.
Gather Your Frames and Art on a Budget
Thrift stores are your best friend here. I hit up two different Goodwills on a Tuesday afternoon (Tuesday is the magic day, less picked-over). Found a vintage brass frame for a dollar fifty, a deep walnut one for two bucks, and a plain black one I later spray painted a dusty olive green. Mixing finishes is part of the charm. Don’t try to match them all perfectly. It looks fake when they do that.
For the art itself I used free printables from a few blogs I follow. I just printed them on regular copy paper, nothing fancy. You can also tear out pages from old books, use a child’s watercolor, or frame a piece of linen. One of my frames holds a ripped piece of brown kraft paper with a quote written in Sharpie. It sounds ridiculous but it looks great. The emptiness of a frame is also okay if you layer it with something smaller on top.
- Thrift frames: $1.50 each or less
- Free printable art: Google “vintage botanical printable” or “abstract line drawing PDF”
- Paper: use what you have, cardstock if printer can handle it
- One frame with nothing inside but a shadow – try it, seriously
Style the Shelves with Neutral Textures
I wanted neutral but not boring. So I brought in three elements: plants (a snake plant cutting in a tiny terracotta pot, and a garland of dried eucalyptus that sheds constantly, don’t buy it), a couple of books stacked horizontally with their spines turned inward so you only see the pages, and a small ceramic dish I made in a pottery class that looks nothing like a bowl. It’s lumpy. I love it.
The trick is to vary heights and shapes. Put a tall frame behind a squat stack of books. Let a plant trail over the front edge of the shelf. Leave some empty space too. My top shelf has only one small frame and a single dried pampas stem, and that bare stretch of wall acts like a visual exhale. That’s the thing about cozy. It doesn’t mean crammed.
(Side note: I initially wanted a little wooden sign that said “home” in cursive. I resisted. You should too. You can do better than a sign you can buy at Target for $12.99. Not that I’m judging, I almost bought one, but the thrifted frames feel more honest.)
Arrange Your Gallery Wall Layout (Without a Single Nail)
Before you hammer anything, lay everything on the floor in front of the sofa. Arrange and rearrange. Move the tall frame next to the short one. Take a picture with your phone and look at it in black and white – it helps you see the balance of dark and light spaces. Then tape pieces of newspaper to the wall in the shape of each frame. That way you can step back and see the whole composition before you commit.
I use painter’s tape and a laser level because I’m not a pro and my eyes lie to me. One tip: start with the largest piece and place it slightly off-center. Symmetrical gallery walls can feel stiff, especially in a cozy living room. You want informal, lived-in. Like things just ended up there over time. It’s okay if a frame is a quarter inch higher than its neighbor. Nobody is measuring except you.
Keep the Vibe Cozy and Personal
Lighting matters a lot. I aimed a small clamp lamp up at the shelf from the side table, casting a soft shadow behind the frames. At night that corner glows. It feels like a little stage. Warm lightbulbs only, 2700K. White bulbs ruin the mood instantly.
What else makes it cozy? A small stack of coasters you actually use. A candle you burn until the wax pools all the way to the edge. Even a tiny bit of clutter, like a pair of reading glasses resting on a book. I left a single dried orange slice in a glass jar on the bottom shelf. It’s a weird detail but people always ask about it. That’s the personal touch. No one else has that exact orange slice.
I’ll be honest, I changed the arrangement twice in the first week. Moved a frame from the shelf to the wall, swapped out a plant. That’s fine. It’s not a museum exhibit. It’s your wall.
The Total Cost Breakdown (Spoiler: Under $50)
Let’s do the math so you believe me:
- Two floating shelves (clearance pine, 24 inches each) – $12.00
- Paint (I had a quart of leftover trim paint, but a sample jar costs $4) – $0.00 for me, or $4 for you
- Thrifted frames (3 frames, total) – $5.50
- Free printable art (ink and paper I already had) – $0.00
- Snake plant cutting from a friend – free
- Small terracotta pot (dollar store) – $1.25
- Dried eucalyptus garland – $6.99 (but honestly, skip it, it sheds like crazy)
- Books (from my own shelves) – $0.00
- Ceramic dish (pottery class, but that was a sunk cost) – free in this context
Total: $25.74 if you already have paint. Under $30 even if you buy a sample. Under $50 easily.
I’m not gonna lie, the biggest expense was the shelves themselves, but even those were cheap. You could go even cheaper with a piece of pine board cut at the hardware store and some brackets. But floating shelves look cleaner, and they hide the bracket, which is why I wanted them.
Anyway, the corner is done. Every time I walk past it I pause for a second. It took an afternoon. It cost less than a dinner out. And it makes the room feel like my room. That’s the whole point.
If you try this, I’d love to see it. Tag me if you share it online. Or just send a photo to a friend. Or keep it to yourself and smile when you walk by. That’s allowed too.
#Floatingshelves #GalleryWall #NeutralHomeDecor #CozyLivingRoom #BudgetDIY
Leave a Comment