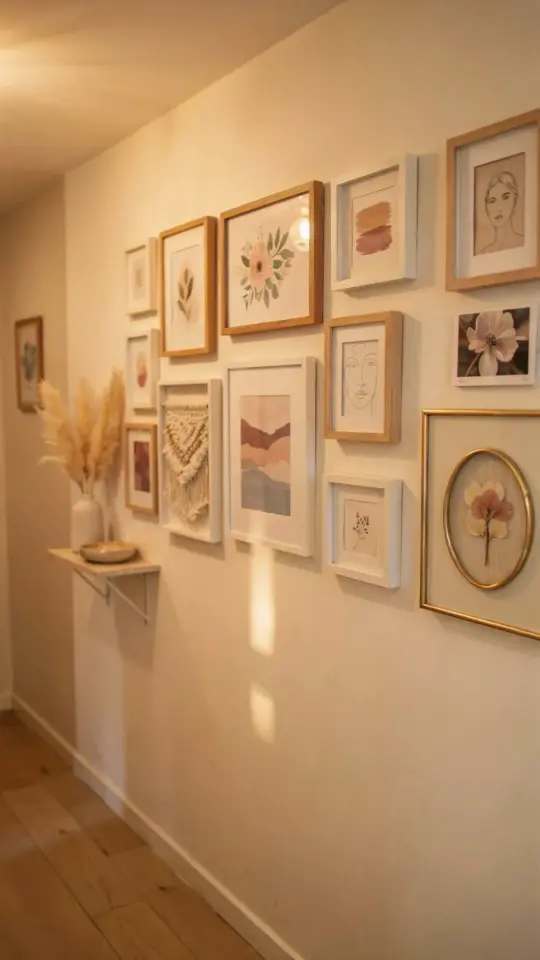
I love a good gallery wall, but I hate the price tag that usually comes with it. So last month I forced myself to try a DIY budget gallery wall using thrifted frames and free printable art. Total cost? Under $20. Not gonna lie, I was shocked it worked. I even snuck in a few of my kids’ crayon masterpieces to make it feel less like a catalog and more like, well, us. And the whole thing started with an arrangement on the living room floor to avoid random nail holes. Honestly, you can do this too. No big spending required. Save this for your next weekend project. Let me walk you through the themes I used.
Thrifting frames on a mission: how I scored gold without spending cash
Here’s the thing about thrifting frames. You have to be patient and a little weird about it. I hit three Goodwills and one random garage sale where a lady was selling her dead aunt’s craft room. I grabbed six frames for $8 total. One was god-awful gold plastic, but I sprayed it matte black in five minutes. Another had a strange bumpy texture I actually kept because it added grit. Ok so, look for frames with intact backs and glass. Warped frames? Skip them. Broken glass? Pass. But mismatched sizes are your friend. That’s where the magic happens.
I ignored color completely at first. Silver, wood, black, even a bright blue one. Paint unifies them later. Or just leave them chaotic if that’s your vibe. My personal rule: never pay more than $2 per frame. I broke that rule once for a solid oak frame with real glass. I paid $4. Still think about it.
Best free printable art websites I actually used (and one I hated)
Free printables are everywhere, but most are ugly. Let me save you time. I used three sources.
- Unsplash for high-res nature photos. I printed a black and white mountain scene on regular paper and it looked like an expensive photograph. No joke.
- Canva’s free templates but I edited them to remove the Canva watermark. A little cutting and pasting, nothing illegal. I made a simple quote print that says “This is a nice house” (sarcastic, but it makes me laugh).
- Old botanical illustrations from the Biodiversity Heritage Library. Weird, I know. But they’re public domain, so you get these vintage plant drawings that look like they cost fifty bucks. I printed one on cream cardstock and it instantly looked antique.
One site I hated: a blog that promised “100 free prints” but half were low-resolution and the other half required an email and then sent spam. Avoid those. Stick to the three above. And seriously, use decent paper. Regular printer paper is fine if you’re broke (I was), but matte photo paper makes a huge difference. Like night and day. Or just print on cheap paper and frame it behind glass. Nobody inspects that closely.
How to mix kids art in a gallery wall without it looking like a refrigerator
My daughter drew a cat with six legs. My son made a scribble he calls “fire explosion.” Most people would hide those in a drawer. I framed them. But here’s the trick: you don’t just slap them in any frame. Use a mat. A simple white or black mat elevates a toddler’s mess into something intentional. I cut mats from old poster board I had lying around. Sure, the edges were a little rough, but that’s character.
Another idea: group their artwork together in a cluster. I put three small kid drawings in identical thrifted frames (all painted the same color) and hung them as a set. Suddenly it looked like a curated mini exhibition. Pro move: let the kids pick the frame color. My daughter chose hot pink. I hate hot pink. But it’s her wall too, so I let it slide. Anyway, mixing kids’ art with botanical prints and a black-and-white photo creates this lovely tension. It feels real. Not sterile.
Gallery wall layout without nails: the floor trick that saved my drywall
I have committed nail-hole crimes in the past. So many holes. This time I arranged everything on the floor first. I grabbed a big roll of kraft paper (butcher paper works, or just tape printer paper together) and traced each frame onto it. Then I cut out the paper shapes and taped them to the wall. Move them around. Live with them for an hour. Does that layout feel right? No? Rearrange.
Here’s what I learned: don’t try to make it symmetrical. It looks fake. I used a loose grid for the center and then let one frame jut out to the side. My husband said it looked crooked. I said it looked intentional. He backed down. The floor arrangement also lets you test spacing. I kept two inches between frames, but honestly, eyeball it. If it looks balanced, it is balanced. One day I had all frames on the floor and my cat walked right through them, knocking over three. Fine. That forced me to simplify. I dropped two frames entirely. Better that way.
No damage gallery wall hanging tips for renters (and lazy people)
I used picture-hanging strips for most frames. The smaller ones, no problem. But my heavy oak frame needed a nail. So I used a single nail and then covered it with a frame. Smart, right? For lightweight frames, command strips are your best friend. Just clean the wall first. I didn’t clean the wall first on one strip and it fell off at 3 AM. Scared the dog. So yeah, wipe the dust off.
Another trick: use tiny finishing nails for the bigger frames. They leave a hole smaller than a pinprick. Fill it with toothpaste later if you move out. Not joking, toothpaste works. Spackle is better but toothpaste in a pinch. I once used white glue mixed with baking soda. Weird but functional. Anyway, plan your layout so you hang the heaviest frames into studs or anchors if possible. For the rest, strips are fine. One more thing: level each frame individually. Do not trust your eyes. Use a level. My eyes are liars.
Budget gallery wall styling ideas that cost zero dollars
Once everything was up, I realized something was missing. The frames looked too… clean. So I added some small objects. A little dried flower I pressed between pages of a book years ago, tucked into the corner of one frame. A tiny ceramic bee I found at a garage sale, glued onto the edge of another frame. Stupid little touches that make it yours.
I also hung a mini shelf below the gallery wall and put a thrifted vase with a fake fern. That shelf cost $3 at IKEA. Not glamorous, but it anchors the arrangement. If you have nothing to add, walk around your house. Grab a keychain, a postcard, a flat stone. Clip them onto the frames with mini clothespins. Yes, that’s a thing. Finally, step back and take a photo. Print that photo and add it to the wall. Meta, I know. But it works.
So there you have it. My weird, messy, under-$20 gallery wall made from thrifted frames, free printables, and a kid’s mutant cat drawing. Honestly, it’s my favorite thing in the house now. And yours can be too. Grab some frames, hit up a free image site, and lay it all on the floor. No expensive tools, no perfect plan. Just a wall that feels like you. Pin this for later or tag me if you try it. I’d love to see your chaotic creation.
#diywallart #gallerywalldesigns #budgetdecor #thriftedframes #freeprintableart
Leave a Comment