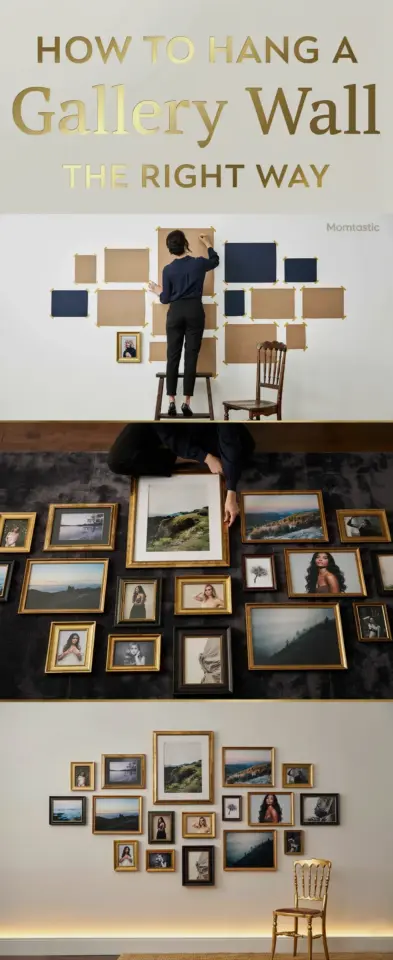
A full wall of mismatched frames can sit in a corner of your bedroom for three months. I know this because my own frames sat exactly there, leaning against the baseboard, gathering a fine layer of dog hair and regret. Then I spent one evening fixing it with roll of kraft paper, a pair of scissors, and a lot of painter’s tape. So here is the honest truth about building a gallery wall: the hang is the easy part. The layout is where everything falls apart. This DIY gallery wall method removes the guesswork by using paper templates, so you can find your perfect arrangement without committing to a single nail hole until you are absolutely sure.
## Why One Extra Nail Hole Can Ruin Your Whole Vibe
A random hole in the drywall is not the end of the world. But it is a tiny monument to your indecision, a little crater that you will have to patch, sand, and repaint before you move out. I have a particular hatred for the spackle-and-touch-up dance, mostly because I can never match the paint sheen correctly. You know what I mean, that weird glossy spot that reflects light like a beacon.
Hanging a picture is supposed to be a satisfying, five-minute task. What kills the satisfaction is the third attempt, when you realize the first two holes are now visible beside the frame. Once you have patched a few of those yourself, you will understand why the paper template trick is not just a clever hack, it is the only way you will want to hang art again. This method protects your walls, keeps your layout flexible, and takes about as long as answering a few frantic texts from your mom.
## The Real Secret: It Is All About the Paper and the Tape
Here is the thing, you do not need a laser level for a casual gallery wall, and you do not need a projector. You need butcher paper or kraft paper, a pencil, scissors, and painter’s tape. I also suggest having a friend on standby, ideally one with an opinion because you will eventually need someone to tell you that your vintage map is on a weird tilt. Get the paper roll that is at least 18 inches wide so you can trace larger frames without taping scraps together like a kindergarten project.
Ok so the process sounds boring on paper, but it is actually kind of fun. You trace each frame face down on the paper, cut out the shapes, and tape them to the wall. Then you step back, sip your coffee, and play interior designer without the risk. Having the physical silhouette on the wall tricks your brain into seeing the finished product, which is somehow much more effective than holding a giant frame up with your arms while trying to imagine the spacing.
## How to Build a Gallery Wall Layout Without the Guesswork
Let me walk you through the exact method I use. It works for a classic grid, a scatter layout, or a shelf-based arrangement. Just take it step by step.
– Gather your frames and remove the hanging hardware from the back. I leave the wire or sawtooth hanger on, but it helps to know where the center of the frame is so you can mark the hook position correctly on your paper template.
– Lay the kraft paper on the floor and trace around each frame. Use the pencil to write the room and the frame name on the paper, like “kitchen, small blue floral” so you do not mix up your templates later.
– Cut the shapes out with scissors. Cut slightly inside the pencil line so the template matches the exact frame size, not the pencil width.
– Tape the cutouts to the wall with painter’s tape. Use a few strips, not a single flimsy piece.
Start with the largest frame first. That becomes your anchor. Tape it up at roughly eye level, which is about 57 to 60 inches from the floor to the center of the piece. Then arrange the smaller templates around it. This is the beauty of this method; you can slide paper around on the wall as much as you want without making a single mark.
## Moving Things Around Until It Clicks
You will spend about twenty minutes standing back and shifting paper. This is normal. Honestly, it is the part that makes the final result look intentional and professionally planned. Move the paper left, shift it down an inch, swap the position of two templates. Pay attention to the negative space between the frames. I like a consistent gap of about two inches between all pieces, but a gallery wall can also work with tighter or looser spacing depending on your room size.
My personal approach is to start symmetrical and then break it. I will place two big pieces on the bottom, two smaller on top, then slide one of the square frames over to the side to create a little rhythm. You do not have to plan this mathematically. You just look at the wall and ask yourself if it feels heavy on one side or if there is an awkward empty gap in the middle. Trust your gut. If something feels off, it is off.
One tip that changed everything for me: take a photo of the wall while standing squarely in front of it. Then look at the photo on your phone. For some reason, a layout that looks chaotic in person becomes clearly wrong in a photo, and a good layout proves itself. Weird how that works, but I use it every time to make my final tweaks. You can also look at the photo from a few feet away, and this helps you notice if your frames are not aligned to anything.
## Hanging Your Frames With Zero Guesswork (and No Extra Holes)
Once the templates are exactly where you want them, do not put the hammer away yet. This is the moment to mark your hanging points directly on the paper. For a frame with a wire, you want to know the midpoint of the wire when it is pulled taut. My trick is to grab the wire, pull it up toward the top of the frame, and measure the distance from the top edge of the frame to the apex of the wire. That is the number you need.
Write that measurement on the paper and flip the paper over. On the wall, you will find the top center of the paper shape, measure down that exact distance, and put your nail or hanger there. Do this for every template. Then start hammering. Because the paper is still on the wall, all your holes are in the correct spots. You will pop the paper off after each nail is in, or you can pull them all down and hang the frames in order.
The satisfaction of a frame that goes onto the wall and sits perfectly level is completely underrated. And because you already did the heavy lifting in the layout phase, the hanging phase takes maybe ten minutes. You just need a hammer, a level, and a fistful of simple picture hanging nails. I used the small ones with the little hook, not the big plastic anchors, because my frames are all under five pounds. For heavy pieces, use a stud finder and proper drywall anchors.
## What to Do When Your Frame Needs a Different Spot
This is my favorite thing about the template method. Let’s say you hammer the nail, pull the paper away, and hang the frame. Then you realize it looks terrible with the mug of pens on the shelf below. With a traditional method, this is where the hole fixing begins. With this method, you just move the paper, pull the nail, and relocate it. You have only made one hole, not five.
You should also use this method to test out a new frame or painting before you even buy it. If you have a frame on your shopping list, trace a paper version of its size, tape it up, and live with it for a few days. This is a little weird, sure, but it beats spending money on a huge, heavy mirror only to realize it does not fit the wall. I did this with a giant vintage map and saved myself from a very expensive mistake.
The smaller frames are the easiest part. You can group them in a cluster on the paper, treat the whole cluster as one unit, and hang them with just a couple of nails each. This trick is great for a bathroom wall or a narrow hallway where you have a lot of small pieces. Actually, measure your wall first. A hallway that seems spacious can quickly turn into a cluttered mess if you do not lay it out first. So measure the wall space, mark out the boundaries on your floor, and then arrange the paper templates inside those boundaries. You will never accidentally run out of wall space again.
## The Easy Way to Patch a Mistake (Because It Happens)
Look, sometimes you still mess up. The nail goes in crooked, the hammer slips and dents the paper, or you accidentally make a hole that is twelve inches away from where you meant to be. That is life. When it happens, keep a small tube of spackle and a plastic scraper in your toolbox. Fill the hole, let it dry for an hour, and sand it smooth with a fine grit block. A dab of paint over the patched spot does the trick, just use a foam brush and a tiny pot of paint from the hardware store.
That is the beauty of this whole project, you are not avoiding the occasional missed hammer swing. You are avoiding the systemic problem of a wall littered with dead-end holes from design changes. The paper method keeps you from going down that path in the first place. You get to be creative, mess around with the layout, and still walk away with a clean wall. It is the rare DIY project that solves the artistic part and the technical part at the same time.
At the end of the evening, your frames are up, your nail holes are exactly where they need to be, and you feel a little proud every time you walk past the wall. That is the goal, right? A curated, collected look that did not require a giant mess or a fresh hole in the plaster. Grab your paper and give it a shot this weekend, your wall will thank you. If you have a cool frame arrangement that worked out well, tag me in a photo, I love seeing these things come together.
Leave a Comment