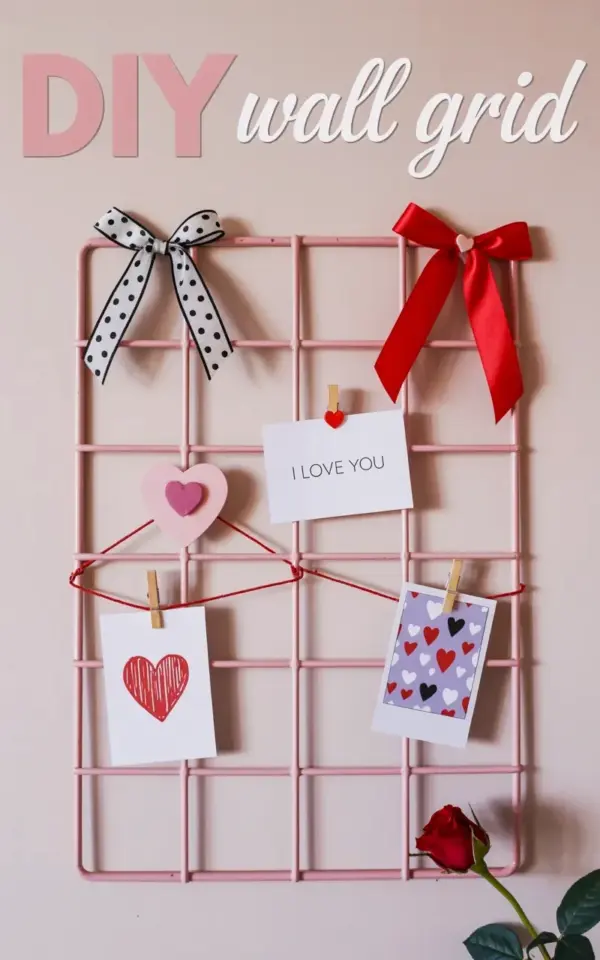
A pink metal grid on a light beige wall. That’s the whole foundation of this Valentine’s Day wall grid, and honestly, it’s the easiest holiday display I’ve put together in years. The photo you’re looking at shows exactly that: a 5×5 grid of thin metal bars, holding a few simple decorations that took about fifteen minutes to assemble. No drills, no heavy frames, no complicated wiring. Just a grid, some ribbon, a clothespin, and a couple of cards. If you need something for Valentine’s Day by tonight, this is it.
What You Actually Need for This Valentine’s Day Wall Grid
Here’s the thing: you probably have most of this stuff already, except for the grid itself. I bought a pink metal grid from a craft store years ago, and it’s been sitting in my closet through three different apartments. It’s roughly 20 inches square, with horizontal and vertical bars creating that clean 5×5 pattern you see in the photo. You can find similar grids online or in the wall decor section of any big-box store, usually for under fifteen dollars.
- A metal grid (pink, white, or black all work, but pink is the star here)
- Two ribbon bows: one black and white polka dot, one solid red
- A small heart-shaped clothespin, ideally pink
- A white card with a red heart drawing (or any card you can quickly doodle on)
- Command hooks or small nails, depending on your wall situation
That’s the whole list. No glue gun required, which is honestly a relief because I always burn my fingers with those things. The polka dot bow on the top left corner and the red bow on the top right corner are just looped through the grid bars. No tying, no knotting, just tuck and pull.
How to Hang a Wall Grid Without Making a Mess of Your Wall
My beige wall is rental property, so I’m not about to hammer a bunch of nails into it. I used two Command picture hanging strips, the velcro kind, one on each side of the grid’s top bar. That’s enough to keep it level and flush against the wall. If your grid is heavier, add a third strip in the middle or use a single small nail at the top and let the grid rest on it.
You want the grid at eye level, obviously, but think about where you’ll actually see it. Mine is in the hallway just outside my kitchen, so I walk past it about twenty times a day. The photo shows the grid mounted slightly high, with the pink “DIY” text and white cursive “Wall grid” lettering at the top. Those little text pieces are actually separate decorations I clipped onto the grid, but you can also just tape them to the wall above it.
Press the grid against the wall for a solid thirty seconds after you attach the strips. Then wait an hour before hanging anything on it. I know, that’s annoying. Do it anyway.
Adding Ribbon Bows Without Losing Your Mind (ValentineDecor)
Ribbon bows are the least fiddly part of this whole project, which is saying a lot because they can be genuinely fiddly. The black and white polka dot bow on the top left is one of those pre-made bows from the dollar store, the kind with a wire center that lets you bend the loops whichever way you want. The red bow on the top right is from an old gift wrap set. Both have short wire tails that you can wrap around the grid’s bars in about three seconds.
Here’s a trick I learned by accident: don’t center the bows on the grid bars. Place them slightly off-center, near the intersection of two bars, so they angle outward a little. It makes the whole wall grid display feel more casual and less like you’re trying too hard. The bows in the photo sit right at the corners, almost as if they’re holding the whole grid in place, which is a nice visual illusion.
If you don’t have a polka dot bow, any small ribbon with a pattern works. Stripes, hearts, even a plain pink ribbon tied with a loop. Just make sure it’s not too heavy. A huge bow will tip the grid sideways unless you counteract it with something on the other side.
The Tiny Heart Clothespin Trick for Cards and Photos (WallGridDisplay)
This is my favorite part of the whole grid. That small pink heart-shaped clothespin is not a paper clip and not a craft pick, it’s a real clothespin with a heart shape printed on the front. You can find them in the scrapbook section of a craft store, or online if you search for heart clothespins. It holds a white card with a red heart drawing on it, just a simple marker doodle, nothing fancy.
The card itself is important. I cut mine from a blank index card because it fits perfectly inside the grid’s squares without overlapping the bars. The one in the photo is about 3×5 inches, clipped to the center of a bottom row, right around the third intersection from the left. You could absolutely put a photo there instead. Or a note from your partner. Or a to-do list if you’re me and you forget to buy milk.
Another white card display sits nearby in the photo, also clipped to the grid. I used a second card with a slightly different heart doodle, just to balance the visual weight. One card on its own would have looked lonely. Two cards give the eye a little path to travel across the grid.
Swap Cards for Photos or Notes After Valentine’s Day (ValentineCrafts)
This is the part that makes the whole project worth it. Once February 14th passes, you’re not stuck with a holiday-specific eyesore. Pull off the red bow, swap the heart cards for a few snapshots from last summer, and the pink grid just becomes a regular wall display. The polka dot bow can stay all year if you’re into that look. I think it works, but I also have a weird soft spot for polka dots, so take that with a grain of salt.
The wall grid display is versatile in a way that most Valentine’s decorations aren’t. A garland or a banner screams “Valentine’s Day” for about two weeks, then it’s just clutter. This grid can hold birthday cards, dried flowers, a child’s art project, or even a pair of sunglasses if you want to be chaotic. I once clipped a takeout menu to mine when I was cleaning the kitchen counter, and it honestly looked intentional.
If you’re making this as a gift, you can personalize it with more than just cards. Add a small envelope with a handwritten note. Tuck a candy wrapper into the grid bars. The clothespin makes it easy to change things up without disturbing the grid itself.
Make It Your Own Without Breaking the Budget
Not everybody likes pink, and that’s fine. You can spray paint a basic black grid from the hardware store in about ten minutes. Or leave it unpainted for a more industrial look. The photo has that specific pink grid with the white cursive text, but the technique of clipping bows and cards to the bars works on any grid shape, including those wire cube storage panels people use as room dividers.
One thing I’ll say about the 5×5 pattern: it gives you enough open squares to arrange things in a loose diagonal or a scattered pattern without looking messy. You don’t need to fill every square. In fact, please don’t fill every square. Let some spaces stay bare. The beige wall showing through the empty squares is part of the design, it keeps the whole thing from feeling claustrophobic.
A quick word on the bows. The black and white polka dot bow in the photo has a slightly loose wire loop, which makes it look softer. The red bow is pulled tighter. You can adjust both after you hang them, so fiddle with the loops until they sit the way you like. Bows have a habit of drooping, and that’s okay. A little asymmetry looks more human, less store-bought.
Why This Works So Well for Last Minute Valentine’s Day Decor
Let me be blunt: most Pinterest Valentine’s Day projects are either too crafty or too expensive. This one is neither. The grid is reusable, the materials are cheap, and the assembly time is so short that you could technically do it while the coffee brews. I’m not exaggerating. I timed myself when I made mine, and from unboxing the grid to clipping on the last card, it took fourteen minutes.
The photo shows a red heart drawing on a white card, but you don’t even need good handwriting for this. My heart drawing is lopsided and it still looks fine. You could trace a heart from a cookie cutter, or cut one out of construction paper and tape it to the card. The clothespin hides the top edge anyway.
One last practical tip: if your wall is dark, not light beige like mine, the pink grid will pop differently. You might want to add a white border or tape a piece of white cardstock behind each clipped card to make it stand out. On a light wall, like we have here, the grid reads clearly and the bows do the heavy lifting.
So that’s the whole little project. A pink metal grid, a few ribbons, a heart clothespin, and you’re done. If you make one, I’d love to know how it turns out. Drop a comment below or tag me in your photo, I’m the one with the cookie tin full of clothespins and a strange amount of opinions about ribbon placement. Happy Valentine’s Day, and may your walls stay as calm and beige as you need them to be.
Leave a Comment