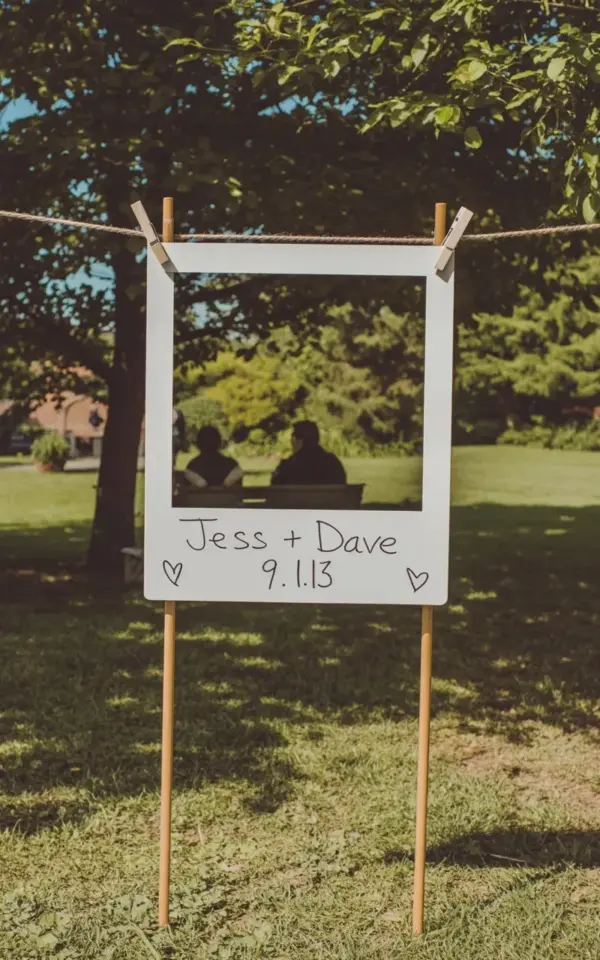
The photo that started this whole thing is still saved in my wedding folder. A giant white polaroid frame on wooden poles, stuck right in the grass, with “Jess + Dave 9.1.13” handwritten across the glass. Trees behind it, afternoon sun coming through the leaves, and people sitting on a bench in the distance, all blurred and dreamy through the frame.
This DIY wedding photo frame is such a cute idea for an outdoor ceremony. You’ve seen that image on Pinterest, maybe you even saved it. That frame isn’t just a pretty prop, it’s the backdrop that gets everyone lining up for pictures, a place where your guests write notes, and honestly, it’s a big reason your wedding photos will look different from everyone else’s.
The best part? It’s quick to build. Actually, it’s one of the fastest projects I did for my own wedding. You need some basic wood, a weekend afternoon, and a marker.
What a DIY Wedding Photo Frame Actually Does at an Outdoor Ceremony
At my own outdoor wedding, the space was pretty. The garden was green, the chairs were white, but it needed something to pull people in. The polaroid wedding frame was that something. It gave guests a natural place to gather without anyone having to direct them. For a wedding backdrop idea, this one works because it has a clear purpose. People instinctively know what a polaroid means. It’s a photo moment, waiting to happen.
For the ceremony itself, we positioned it to the side of the seating area, not behind the altar. That way it didn’t compete with the vows. But it was close enough that after the “I dos,” the drinks came out, and the polaroid wedding frame became the unofficial photo booth.
Building the Large White Polaroid Frame with Wooden Poles, No Fancy Skills Needed
You can use any old window frame or wood. I mean it. A big blank wall, a slab of reclaimed wood, or like we did, a repurposed window frame that had been sitting in my dad’s garage for years. He’d been meaning to fix it, I commandeered it, best decision.
If you’re starting with a plain piece of wood, measure out your polaroid shape. The white frame body gives it that instant polaroid look. The bottom section is longer, that’s where guests can hold the frame close to their faces for a skinny arm shot. You want the wood smooth, painted flat white, with no gloss. Gloss catches the sun and makes photos look washed out.
For the wooden poles, use pressure-treated lumber so they hold up in grass for the whole day. Attach the frame to the poles with strong screws and L-brackets, right to the back so the hardware is invisible. Then, sink the poles into the ground before guests arrive.
Here’s what I’ll say bluntly: do not skip the stabilization. Test the frame before the wedding day. Give it a good shake. Weddings have wind, kids run, drunk uncles lean on things. It needs to stand firm.
How to Write Your Names and Date with Hearts on the Glass
That handwritten text “Jess + Dave 9.1.13” in the photo, complete with little hearts on either side, didn’t happen in five minutes. It took me four tries to get the spacing right. The secret is to practice on scrap paper first, same dimensions as your frame glass.
Use a wet-erase marker, not a permanent one. That way, if you hate your handwriting or you mess up, you can wipe it off with a damp cloth and start over. Also, you can do it over and over for different events. I used a paint pen for ours, one that wouldn’t smear in the heat. But my cousin tried the same thing and the ink ran during the ceremony, so honestly, test your marker in the sun first.
Plan around the center of the glass. It’s not a billboard, so don’t fill every inch. Leave breathing room. A balanced line of handwriting looks classy, while wall-to-wall words look like a ransom note. Also, the hearts on either side of the date are non-negotiable. Everyone comments on them.
One weird tip that actually works: write the words while the frame is still mounted on the poles and standing in the grass. It looks different from above than it does flat on a table. You’ll thank me when you see it in the actual photo.
Polaroid Wedding Frame Placement in the Grass, What I’d Change
In the original photo I’ve seen, the frame is propped up on a grass lawn with trees in the background. You can see silhouettes of people sitting on a bench far behind, the natural sunlight filtering through green foliage. That spot is practically perfect.
But a mistake we made at my wedding, and one I see a lot online, is placing the frame right next to a busy table or flowery hedge. It becomes visual noise. You want clean landscape behind the frame and in front of it. You also want it in shade or half-sun, not full noon sun. Squinting guests make terrible photos.
Set it up in a spot with a winding path, a patch of lawn, or even a simple hedge wall behind it. The polaroid effect works because it simplifies the world around you, so give it a calm environment to work with.
Pro tip: cut two parallel slits in the grass with a knife before sinking the poles. It keeps the edges of the turf clean and stops the grass from looking destroyed after the ceremony. Pull the poles out at the end of the night, cover the holes with a little loose soil, and the lawn will recover before people even notice.
Garden Wedding DIY Additions That Make People Actually Use It
The frame alone will get some attention. But if you want lines of guests eager to pose, add a small basket hanging from one of the poles. Inside that basket, put a jar of chalk. Trust me, this changes everything.
When guests see the frame, they want to join the fun, but they might feel awkward just standing there. The chalk lets them add their own message, a lucky number, a joke, a tiny doodle. It gives them permission to linger and be silly. One little detail and the polaroid wedding frame becomes a fully interactive garden wedding DIY station.
Also, place a couple of spare wooden peg-style clothespins in the basket. Why? Because kids love them, and adults will use them to clip a small photo or a note to the frame’s edge. It’s odd but it works.
And if you want to take this up a notch, write the hashtag for your wedding on the bottom of the glass, off to the side, in smaller handwriting. That way, your guests remember to tag their photos without you having to stand there and remind them.
How This Outdoor Wedding Photo Display Becomes a Keepsake
This is the part people don’t expect. After the wedding, the frame doesn’t just get thrown away. You can hang it on the fence in your yard, lean it against a garden shed wall, or prop it on the back porch as a permanent garden focal point.
A whole year later, my wife and I propped the same frame in front of a camellia bush, took a photo, and compared it to the one from our wedding day. The grass had grown, the seasons changed, but the frame made it feel like the same moment, suspended in time. That’s something a rented backdrop can never do.
If you use real glass, do a quick clean with vinegar and water before storing it. Store the wooden poles detached in a dry place. When the next wedding in the family comes around, you’ll be the one lending out a ready-made polaroid wedding frame with zero fuss.
Materials List and Build Time for the Polaroid Wedding Frame
Look, here’s what you actually need, nothing more:
– One large window frame or a sheet of plywood cut into a polaroid shape, at least 4 to 5 feet wide
– White outdoor paint and a brush or spray paint
– Two wooden poles, at least 6 feet long each
– L-brackets and screws (or a nail gun if you’re fancy)
– A wet-erase marker or paint pen for the glass
– A level, a mallet, and a buddy to hold things steady
Build time, maybe two hours if you’re working with a partner. Painting and drying time, overnight. Total project feels like a lazy weekend, not a two-month Pinterest rabbit hole.
One more thing about the glass. If your window frame doesn’t have glass, you don’t have to panic. Use polycarbonate sheeting, cut to size, and tape it in. It’s lighter than glass,
Leave a Comment