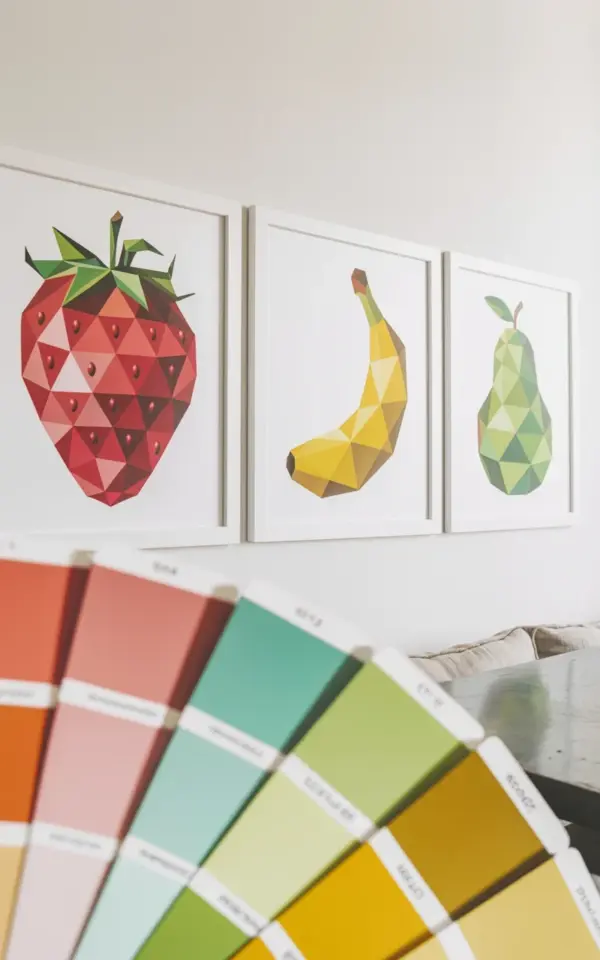
If you have been searching for a simple way to add a modern touch to your home, this geometric fruit wall art set featuring low poly strawberry, banana, and pear prints in white frames is exactly what you need. The set I recently created sits on my own wall, and I keep catching myself glancing at the crisp triangular facets and the clean white frames against my pale wall. This is not just another print purchase; it is a satisfying DIY project that gives you complete control over the final look. Whether you are a seasoned crafter or someone who barely touches a frame, the process is straightforward and the result feels intentional and polished.
Why Low Poly Art Works So Well for Minimalist Decor
Lowpolyart has a unique visual appeal because it turns familiar objects into abstract geometric puzzles. The strawberry, banana, and pear in this set are reduced to triangles and facets, which creates a sense of depth without clutter. This style fits perfectly into minimalist decor because it offers color and shape without busy details. The white frames also help the prints breathe, so the whole arrangement feels airy and calm.
I love how the red strawberry, yellow banana, and green pear each hold their own color story. The triangular segments catch light differently depending on the time of day, which adds a subtle living quality to the wall. For anyone building a fruit-themed gallery wall, these prints provide a cohesive thread without looking repetitive.
Selecting the Right Geometric Prints for Your Space
When you decide to make your own geometricprints set, start by choosing digital files or templates that match the low poly look. Look for designs where the facets are clear and the fruit shapes are instantly recognizable. I used a set that came with three separate high-resolution images, one for each fruit. Make sure the resolution is at least 300 DPI so the print does not look pixelated when enlarged.
Consider the size of your wall and the spacing between frames. A common approach is to use 8×10 inch prints inside 11×14 inch frames with mats. This gives the art breathing room and mimics a gallery display. You can also opt for a smaller set with 5×7 prints if your wall is narrow or if you plan to group them with other pieces.
How to Frame Your Low Poly Strawberry, Banana, and Pear Prints
Framing is the step where the DIY magic happens. For this project, white frames are ideal because they keep the focus on the fruit colors. I found simple white wood frames at a craft store for under $10 each. If you want a budget option, white plastic frames work well too. The key is that the frame is matte or satin, not glossy, so it does not reflect glare.
- Print each design on matte paper to avoid fingerprints and glare.
- Cut the prints down to fit your mat opening, if needed.
- Use acid-free tape to attach the print to the mat backing.
- Assemble the frames and wipe the glass clean before closing.
- Consider using acrylic instead of glass if you hang the set in a high-traffic area.
If you prefer a frameless look, you can mount the prints on foam board and skip the glass entirely. That approach gives a more modern, floating appearance. For the strawberry, banana, and pear set, I chose white frames with a thin profile to match the minimalist vibe.
Arranging Three Prints for a Cohesive Gallery Wall
Spacing and alignment matter more than frame size. I hung my three prints with exactly 3 inches between each frame, measured from the outer edges. Use a level and a measuring tape to keep everything straight. Another option is to place the banana print slightly higher or lower than the other two to create a staggered rhythm. But for a calm look, equal spacing is safest.
Fruithomedecor often benefits from a gentle color gradient. Hang the strawberry on the left, banana in the middle, and pear on the right. This arrangement mirrors the visual flow of a fruit bowl, which feels intuitive and pleasing. If your prints come with different backgrounds, stick to a white background for all three to maintain unity.
Before you hammer any nails, lay the frames on the floor in front of the wall to test the composition. Step back, adjust, and live with the layout for a few minutes. It is easier to move frames on the floor than to patch holes later.
Essential Supplies and Tools for This DIY Wall Art Project
You do not need a workshop or expensive gear. This DIYwallart project uses basic materials you likely already have or can find easily. Here is a quick list of what I used:
- Three digital low poly fruit prints (strawberry, banana, pear)
- Three white frames with mats (11×14 inch outer size)
- Matte photo paper or cardstock (8.5×11 inches)
- Scissors or a paper cutter
- Double-sided tape or mounting squares
- Measuring tape and level
- Pencil, hammer, and small nails or picture hooks
If you want to add a subtle shadow effect, you can mount the prints on foam board that is slightly larger than the print itself. That creates a floating look inside the frame. I skipped that step because I wanted the cleanest silhouette, but it is a nice option if you enjoy dimensional depth.
Styling Tips to Integrate the Set with Minimalist Decor
Minimalistdecor thrives on negative space. Do not crowd the area around the fruit prints. Leave at least 6 inches of empty wall on either side of the set. If you hang them above a console table or sideboard, keep the table surface clear except for one small vase or a stack of books. The three fruits can handle being the main attraction without competition.
Consider the wall color. A white or very light gray wall makes the white frames disappear slightly, so the fruit forms float. A soft blush or pale blue wall adds a gentle contrast while still feeling minimal. I painted my wall a warm off-white, and the prints became a subtle focal point that does not scream for attention.
Lighting also matters. A picture light aimed at the center of the trio brings out the facets of the strawberry and pear. Even a small LED spot from above can transform how the triangular segments catch the eye. Avoid direct sunlight to prevent paper fading over time.
Alternative Ways to Customize Your Low Poly Fruit Art
Once you have the basic set, you can personalize it further. Swap the white frames for black or natural wood if you want a different mood. Or replace one of the fruits with another low poly shape, like an orange or a slice of watermelon. The banana is especially easy to recolor if you want a more monochrome look for a specific room.
If you enjoy digital design, you can create your own low poly versions using free apps like Canva or even a basic vector editor. That way you control the color palette and the exact angle of each fruit. I stuck with pre-made files because I liked the consistent triangular style, but DIY design is a great next step for experienced crafters.
For a faster version, you can order canvas prints with the same images and skip framing entirely. Canvas adds texture and works well in kitchens or breakfast nooks. But the framed paper look feels more refined for a living room or entryway.
Final Thoughts on Building Your Own Geometric Fruit Wall Art Set
Creating this geometric fruit wall art set was one of the most rewarding DIY projects I have tried. The low poly aesthetic makes modern decor feel approachable, and three prints give you enough variety to avoid monotony. The white frames tie everything together without stealing attention from the strawberry, banana, and pear facets. If you want a fresh, uncluttered look that still feels personal, this is a fantastic weekend project.
I encourage you to gather your supplies, pick a spot on your wall, and give it a try. Once you see the triangular shapes come to life above your sofa or in your dining nook, you will wonder why you did not make it sooner. Share a photo when you finish, I would love to see your version.
#lowpolyart #geometricprints #fruithomedecor #DIYwallart #minimalistdecor
Leave a Comment