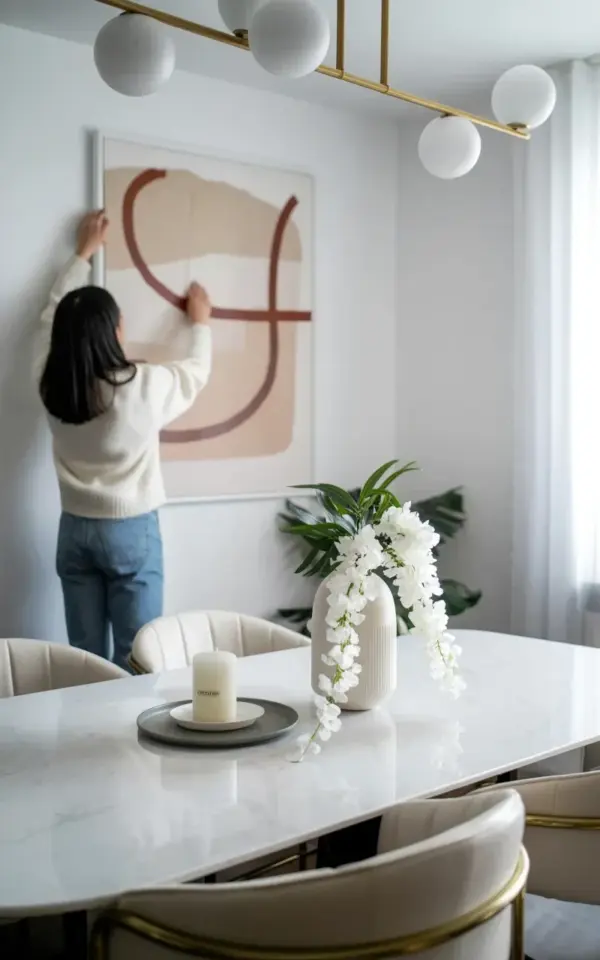
Hanging abstract wall art is the quickest spring refresh for a neutral living room, and honestly, it takes less time than reorganizing a single closet. The curved brown lines on that light beige background look so good with the brass globe pendant hanging overhead. It is a look that whispers renewal without shouting for attention. If your walls have felt a little flat since January, this is the project for you. This DIY wall decor idea is almost effortless, yet it changes the entire personality of the room. Let me show you exactly how to pull it off.
I have a confession to make. I spent a whole weekend last month looking for a piece of art with a specific color palette, only to realize I could just make it myself. The process was embarrassingly simple. The result? A custom piece that matches my sofa perfectly and cost a fraction of what a gallery would charge. You don’t need to be a painter or a sculptor to do this. You just need a plan, some basic supplies, and a little bit of patience.
Why Abstract Wall Art Works for a Spring Reset
Spring is all about light, air, and movement. Abstract wall art captures that energy better than a landscape painting or a family photo ever could. The flowing lines and organic shapes in a piece like this mimic the way vines curl and branches grow. It feels alive.
That said, the specific style matters. You want something with a soft, minimal palette. Think warm neutrals, gentle curves, and negative space. The piece in the photo features sprawling brown lines that meander across a warm beige canvas. That kind of design adds visual interest without creating visual noise. It is the perfect backdrop for a space where you want to relax after a long day.
Here’s the thing: a neutral living room can sometimes feel too sterile. It becomes all white walls, beige sofa, and wood tones. It is clean, sure. But it can also feel like a showroom. Abstract art breaks that coldness. It gives the eye something to follow, a path to wander. It is the cheapest, fastest way to add a layer of human warmth to an otherwise too-perfect space.
Creating Your Own Hanging Wall Art: The Easy Way
Ok so, let’s talk about the actual creation process. There are two paths you can take here. You can paint your own canvas from scratch, or you can take a store-bought piece and customize it. Look, if you are a confident painter, go for it. But for the rest of us, there is a simpler route. You can buy a plain beige canvas and use painter’s tape to block off sections. Then you paint the negative space a slightly different shade of beige. Once it dries, you peel off the tape.
But, the absolute easiest method? Good quality art markers. You just draw the lines directly onto the canvas. No brushes, no paint cleanup, no stress. Using a continuous, flowing motion, you create those lovely swooping curves that echo the inspiration photo. It takes about ten minutes to sketch out the design and another twenty to fill in the thicker parts. If you mess up, just paint over it with gesso and start again. No one has to know.
Or, you can do what I did for my bathroom. I bought a cheap print from a discount store and made a custom frame out of old molding. The art wasn’t great, but the resin frame made it look expensive. The point is to experiment. There is no wrong way to do this, as long as the final piece makes you smile.
Hanging Wall Art at the Perfect Height: A Game Changer
Let’s talk about the most boring but most important part: the hardware. Nothing ruins a spring refresh faster than holes in the wall that are in the wrong place. If you are hanging the art above a dining table, the center of the piece should be around 60 inches from the floor. That is gallery standard. It works for most people.
But wait, there is an exception. If you are hanging it over a console table, you have to account for the table’s height. The art shouldn’t sit too high above the furniture, it needs to feel connected. A good rule of thumb is to leave 6 to 8 inches of breathing room between the bottom of the frame and the top of the table.
Also, do not use a heavier nail than you need. A small picture hook holds a lot of weight. You really only need a hammer and a level. And speaking of levels, use one. Eyeballing it is a trap. I learned that the hard way when a piece I hung looked crooked for three weeks until I fixed it. It was driving me insane. Nobody else noticed, but I knew. So just spend the two minutes and get it level.
Styling the Interior Scene: Flowers, Lighting, and the Marble Table
Now for the fun part. You’ve hung the art. Now you have to make the whole scene look intentional. In the main photo, the white marble dining table anchors the room. It gives the space a clean, luxurious foundation. On top of that table sits a white ceramic vase with cascading white flowers and green leaves. That arrangement is doing a lot of heavy lifting, it brings the outside in.
The brass and white globe light fixture hanging from the ceiling is another piece of the puzzle. Look at the mix of materials here. You have the organic curves of the art, the hard, cool surface of the marble, the warm, glowing metal of the lamps. That contrast is what makes the room feel expensive. It’s a tight edit. Not too much stuff, just enough.
When you style your own table, start with the art. Let it set the color temperature. Then add a plant or a bunch of cut flowers. White blooms are a classic spring choice, but even a simple green branch in a vase will work. Add a candle on a small plate for a bit of texture. Then step back and look. If something feels off, remove one thing. Usually, less is more.
DIY Wall Decor for Renters: Damage-Free Hanging Solutions
Not everyone owns their wall space. I get it. Renters have to be clever. The good news is that abstract wall art is lightweight, especially if you use a canvas without a heavy wooden stretcher bar. You can hang it with adhesive strips that peel off cleanly. They hold surprisingly well.
But there’s a trick to making the adhesive strips work. You have to press them firmly for a full 30 seconds. And you need to make sure the wall is clean and dry before you stick them on. If the wall is dusty, the strips will fail. Honestly, the process is foolproof if you just read the instructions.
Another option for renters is to lean the art against the wall on a shelf or a mantel. This takes away the risk of wall damage entirely. And it looks incredibly stylish. Leaning art feels casual and current. It gives the room that “collected over time” vibe that you can’t fake with a perfectly hung gallery wall. It is also way easier to swap out when you get bored. Spring comes, spring goes, and you can change the art with the season.
Trending in 2025: Curved Lines and Muted Earth Tones
Let’s talk briefly about why this specific look is so hot right now. For the past few years, we had the “organic modern” trend with its curved edges and boucle fabric. Now, in this new year, the focus is shifting slightly. We are seeing more emphasis on *muted* earth tones. Not the bright orange and rust of the 70s, but the softer, washed-out versions of brown and beige.
The single-tone art piece is a direct response to the maximalist floral prints we saw earlier. People want a backdrop that feels calm. The abstract lines on the beige canvas do not fight for your attention. Instead, they suggest movement without chaos.
This trend is also a reaction to the “sad beige” mom aesthetic that took over social media. The correction here is to add *depth* to the neutral palette. You don’t have to introduce bright, loud colors. You just use tonal variations. A deep espresso line on a creamy background adds that depth. It makes the beige look intentional rather than washed out. It’s a clever trick, really.
The Quickest Refresh for Any Room
You don’t have to wait for a big weekend to do this. This is a Tuesday evening project. It is the kind of thing you can finish before dinner. That is the beauty of using a simple canvas and some markers, there is no drying time and no clean-up. You can do it while your coffee is brewing.
And it isn’t just for the living room. This works in a bedroom, a home office, or even a hallway. The light colors and simple shapes work anywhere you need a moment of visual rest. Honestly, I think the small scale is what makes it so useful. You aren’t making a massive statement, you’re editing the mood of a single corner.
The key is to not overthink the process. If the first attempt at a swirling brown line looks more like a mud puddle, let it dry and paint over it. Try again. The process is forgiving. The end result is a room that feels different, a room that feels ready for the new season. That is a wonderful return on your investment.
I hope this gives you the confidence to try it. There is no special skill required, just a willingness to mess around with some paint and a steady hand. If you want to make this exact look, just stick to the beige background and brown accents. Match it with that brass globe pendant and you have a recipe for a beautiful, peaceful space. Save this idea for your next DIY wall decor project. Your walls will thank you.
#abstractwallart #springhomedecor #diywalldecor #neutrallivingroom #wallartinspo
Leave a Comment