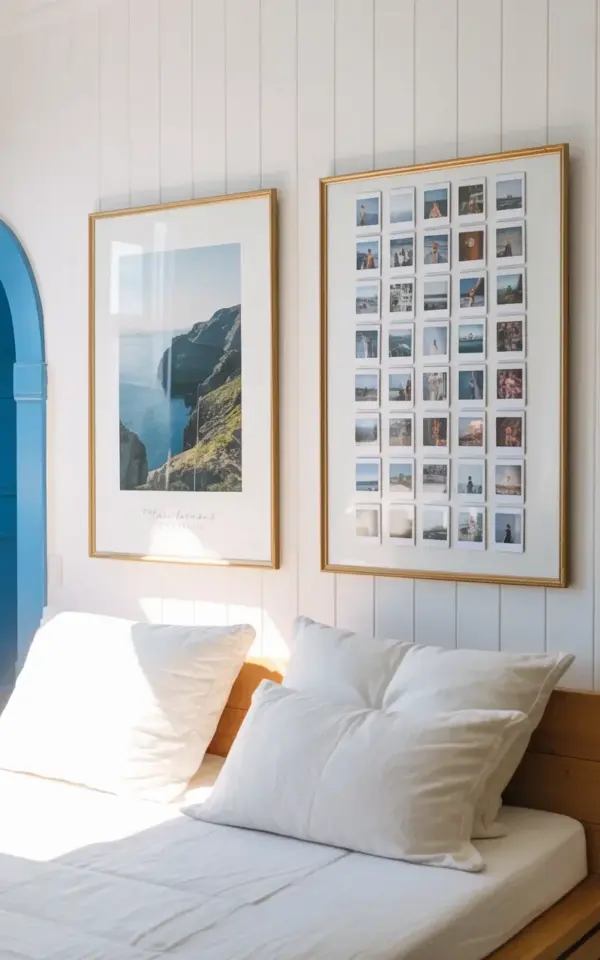
The instant I stepped back and looked at the finished wall, I let out a small sigh of relief. The gallerywall that had been living in my head for weeks finally matched the one in front of me, a mix of one large gold-framed landscape and a tidy 6 by 5 grid of instant photos, all resting on white vertical shiplap. It took about an hour total, and most of that time went into arranging the prints on the floor. The result felt happy and personal, exactly what I wanted above my linen daybed.
Why Shiplap Made This Project So Simple
White shiplap does a lot of the decorative work for you. The vertical lines give the eye a natural rhythm, so even a simple photo arrangement looks intentional. I did not have to paint, patch or measure anything fancy because the wall was already clean and bright.
I hung the landscape first, since it was the heavyweight. The room has a blue painted archway on one side, which adds a playful pop of color, but I wanted the wall itself to stay calm. Shiplap acts like a blank canvas, and gold frames stand out beautifully against it without feeling fussy.
Start With One Large Landscape as Your Anchor
The large landscape is the piece that holds the whole arrangement together. Mine shows a scenic mountainous coastline with blue water and green cliffs. It is the kind of image that makes you pause, and giving it the biggest frame in the room felt right.
When I hung it, I kept the center of the frame at eye level. That sounds obvious, but it matters more with a big piece because it pulls the eye upward in a bedroom. The gold frame picks up the afternoon light, which made the blue in the photo look even richer.
A quick tip: choose a landscape with some open space in the image itself. That way the frame does not feel crowded, and the wall keeps a relaxed, minimalist mood around your bedroom decor.
Arrange 30 Instant Photos as a Grid Before You Hang Anything
This is the step that saved me from a lot of extra holes. I placed all 30 instant photos on the floor in a 6 by 5 grid, with the gold frames already around them. Then I stood over them like a small child looking at a checkerboard, shifting individual prints until the spacing looked even.
The grid does not have to be perfect. What matters is that the outer edges line up reasonably well, and that the overall block feels balanced when compared to the large landscape next to it. I left a consistent gap of about two inches between each frame, which is tight enough to read as one piece but loose enough to keep it airy.
Here is what I laid out on the floor before anything touched the wall:
- A mix of travel shots, coffee stops and candid everyday moments
- A few photos with similar color tones so the grid felt cohesive
- The most colorful prints toward the center to draw the eye
- Lighter, airier shots around the edges to frame the block
Once the grid looked right on the floor, I used painter’s tape to mark the corners. That became my guide for the wall, and it made the whole process feel foolproof.
The Fastest Way to Attach the Frames to Shiplap
I used small picture hangers designed for lightweight frames, and they worked perfectly. The instant photos are not heavy, so there was no need for drywall anchors or complicated hardware. Each frame took about a minute to hang once I followed the tape marks.
A level is your best friend here, but do not obsess over every single frame. The eye forgives a slight wobble, and honestly, a tiny bit of imperfection makes a photo wall display feel collected over time rather than manufactured. I leveled the corners of the grid and let the rest be.
One thing I learned the hard way: always double check the tape marks after you hang the first row. I was off by half an inch in my second row and had to nudge three frames over. It only took a few minutes to fix, but it was a small lesson in patience.
Style the Space Above a Linen Daybed
The wall looks its best when the furniture underneath feels soft and relaxed. I
Leave a Comment