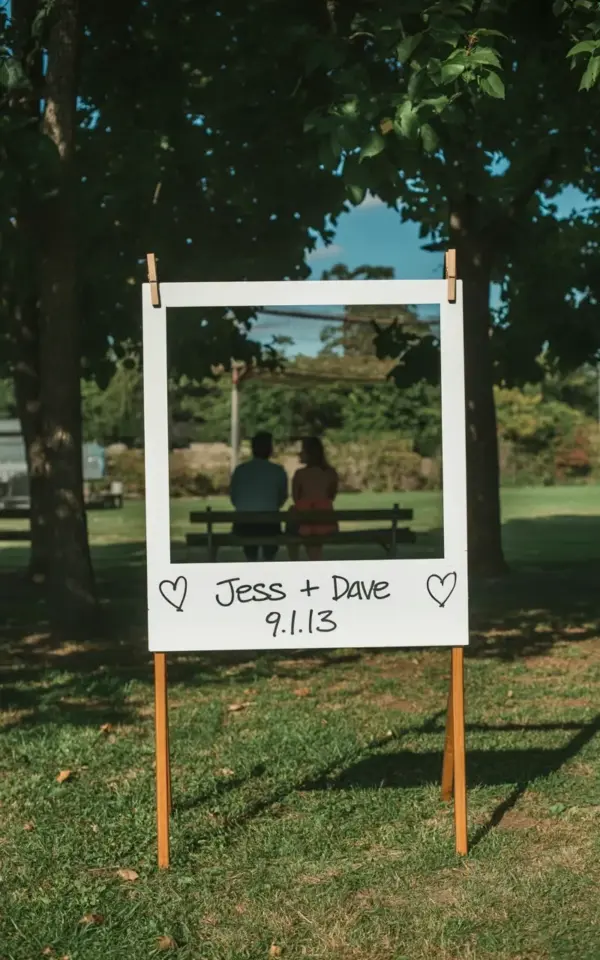
We made a DIY outdoor anniversary photo display for our tenth anniversary party last month, and honestly, I was shocked by how little effort it took. You just need a big white polaroid-style frame, two wooden poles from the hardware store, and a marker. Prop it in the grass, write your names and date with a few tiny hearts, and let the natural light do the rest. Our guests ended up sitting behind it on a bench without us even planning it, and their silhouettes showed through the frame, making the whole thing feel alive and kind of magical. If you want something quick that still looks thoughtful, this is it.
What you need to build your own garden anniversary frame
Here is the short list. Nothing fancy. I grabbed most of it from things I already had in the garage (the poles were leftover from an old tomato stake project, not gonna lie).
- A large white polaroid-style frame – pick one that’s at least 20 by 24 inches so the writing shows clearly and you get a good view through the middle. I found ours at a craft store for fifteen bucks.
- Two wooden poles, each about four feet tall. They should be straight and smooth so they don’t snag the frame. Sand them lightly if you feel rough spots.
- A black permanent marker with a medium tip – the kind you use for labeling bins works best. Honestly, thick markers can blob, and thin ones get lost in the white.
- Optional but helpful: a short piece of twine to tie the frame to the poles if it’s windy. Our garden got breezy around four in the afternoon, and I had to chase the frame across the lawn once.
- The bench your guests will sit on behind the frame. Use any garden bench, or just a sturdy chair. We used our old wooden bench that usually sits by the flower bed.
Picking the right spot for your outdoor party photo
Location matters way more than you think. You want a spot where the sunlight hits the frame evenly but not too harshly, because shadows can wash out the handwriting. I suggest early afternoon, around two or three o’clock, when the light filters through the trees. Our yard has a big oak that dapples the ground, and the green foliage in the background made the white frame pop beautifully. A pure sunny spot without tree cover sometimes leaves the frame looking flat and washed out. And here is the thing nobody tells you: angle the frame so it leans slightly toward the sun. That way the people behind it become clear silhouettes rather than just blobs. We tested it with my husband sitting on the bench, and it literally took thirty seconds to adjust the tilt.
Writing on the polaroid frame (no artistic skill required)
Ok so we are not calligraphers. I write like a doctor with a hangover. But this project still turned out great. Here is the method that worked for us. First, lay the frame flat on the grass or a table. Print your names and date in the center, using all caps for the letters – that gives a cleaner look than cursive if your handwriting is messy. Write “Jess + Dave 9.1.13” with a heart on each side. Small hearts, like the ones you doodle in the margins of a notebook. Not giant valentine hearts, just little ones. Funny enough, I drew one heart too big and had to cover it up by turning it into a flower, but that actually added charm. Anyway, let the ink dry for five minutes before you stand the frame up, because marker on that glossy white surface smears if you touch it too soon.
Why this wedding anniversary decor works so well for garden parties
It is the combination of simplicity and interactivity that sells it. A static decoration just sits there looking pretty, but this frame actually changes when people walk behind it. You get moving silhouettes, laughter, couples holding hands. It makes the anniversary feel alive, not staged. And the best part is that nobody needs a fancy camera phone to get a good picture – guests just snap through the frame and the white border acts like a natural crop. For a garden party this is perfect because it blends into the environment without feeling like a giant store-bought sign. Plus, cleanup takes literally one minute. You pull the poles out of the ground, fold the frame flat, and throw the marker back in the junk drawer. That is it. No glitter, no wires, no plastic confetti that ends up in the grass for weeks.
Real-life tips from making ours that the tutorials skip
Look, I almost ruined this whole thing because I didn’t think about wind. The frame is light, and a gust can knock it over while you are taking photos. So push the poles at least six inches into the dirt – use a mallet if the ground is hard. Another thing: write the text a bit smaller than you think you should. Big letters look bold in your head, but they can crowd the frame and block the view of the people behind it. Leave at least two inches of empty space around your writing. Also, if you store the frame overnight, bring it inside. Dew will make the marker run and the paper edges curl. We left ours out and the next morning it looked like a sad wet cereal box. Not great for day two of a weekend celebration.
One more weird little detail. The bench we used was old and warped, so the silhouettes of our guests showed slightly crooked legs, but honestly that made the photos funnier. It is not meant to be perfect. Imperfection makes people smile. My aunt sat on that bench and her hair stuck up in the back, and through the frame it looked like she had antennae. We laughed about it for ten minutes. So do not stress about precision.
How to photograph the finished garden photo display
Stand a few feet back from the frame, crouch down to get the bottom of the poles in the shot, and let the natural light hit the white surface. The best time is golden hour (about an hour before sunset), but our frame looked nice even at noon because the tree shadows added texture. Have someone sit on the bench behind it while you snap from the front. You will see their silhouette through the center of the frame. Then take a picture through the frame from behind – that gives you a portrait of them framed by the white border with your handwriting overlapping the edges. That second angle is the one we ended up printing and framing for our anniversary wall. And yes, it is that simple. No special lens, no filter, just your phone and a steady hand.
A quick way to reuse this idea for other milestones
We turned ours into a birthday display two weeks later by wiping the names off with a damp cloth (the marker came off easily, thank goodness). You can change the text to suit any event: a garden wedding, a graduation party, or even just a fun summer barbecue. Write “Happy 50th Ben + Sue” or “Class of 2025” and add some stars. The same frame works over and over. That is the real value of this quick DIY project – one afternoon of setup gives you years of reuse. Our neighbors borrowed it for their daughter’s engagement party and wrote a sweet message with a heart and a ring. I loved seeing it travel around the block.
So if you need a simple, honest, low-effort decoration for your next outdoor celebration, just grab a white frame and a couple of poles and give it a shot. It costs almost nothing, takes under an hour, and lets your guests become part of the photo. That silhouetted bench moment? Pure accident for us, but it made the whole thing feel special. Try it for your next garden party, and let me know how yours turns out – I would love to hear what silly silhouettes you capture.
#diyoutdoorphotodisplay #gardenanniversaryframe #weddinganniversarydecor #quickdiyproject #outdoorpartyphoto
Leave a Comment