Honestly, I get it. You found the perfect seashell shadow box at a thrift store, or maybe you finally finished collecting enough beach treasures to fill that frame you bought three summers ago. Then you start arranging, and before you know it, you’re cramming every last snail shell and piece of sea glass into the frame because it all feels too precious to leave out. That is exactly how you ruin a seashell shadow box.
Here’s the thing: I learned this lesson the hard way. My first attempt looked like a geology museum had thrown up inside a picture frame. There was no breathing room, no visual hierarchy, just a chaotic pile of calcium carbonate. The real trick, and the whole point of this article, is that a shell shadow box needs negative space to let each individual piece shine.
Why A Dense Shellshadowbox Fails (The Muddy Mess)
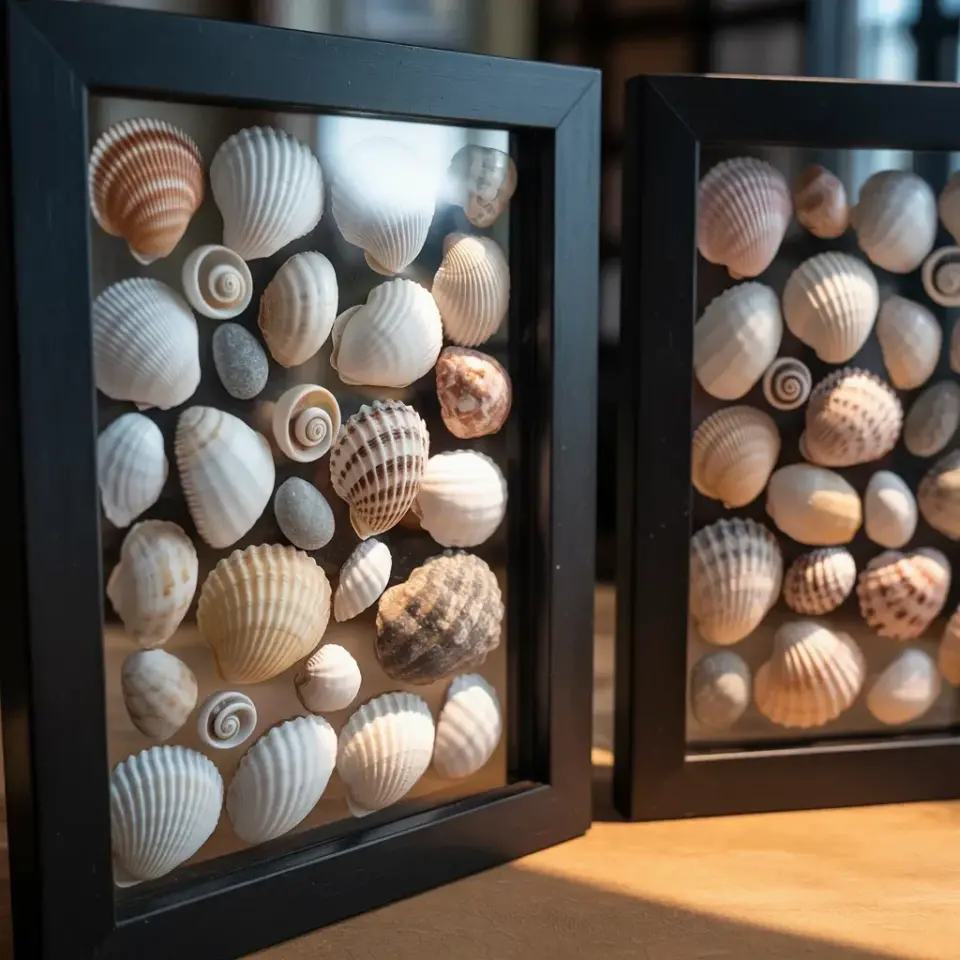
Look, when you overstuff a frame, every shell loses its identity. In the photo that inspired this post, you can see two black frames side by side. The left frame is packed tight, layers of white and beige spirals fighting for attention against small rounded pebbles. It’s not ugly, but it’s exhausting to look at. Your eye doesn’t know where to land.
The right frame is the winner. It has a few choice spiral shells, some open space, and clear acrylic backing that lets the shadows do the work. That contrast is everything. When shells cast soft shadows, they gain dimension. When they are squished together, they flatten into a single boring mass.
So before you start gluing anything down, take a hard look at your collection. If you have more than twenty pieces for a standard 8×10 frame, you are trying too hard. Edit ruthlessly.
Choosing the Right Frame For Your Coastal Wall Decor
Not every frame is built for this project. I prefer a shadow box with a bit of depth, at least an inch or two, because those bulky spiral shells need room to sit naturally. A flat glass frame will squish your starfish and make your cowrie shells look deformed.
Black frames are a safe bet. In the photo here, the dark trim creates a strong contrast against the pale shells. It makes the whites look whiter and the browns look richer. If that is not your vibe, a weathered white oak frame works too, but avoid anything too ornate. The shells are the artwork, not the frame.
You also want to consider the backing. The acrylic backing in the photo allows for some ghostly shadows behind the shells. It adds a subtle layer of depth that cardboard backs just cannot replicate. If you can, swap out the backing for clear acrylic or even a mirror.
The Golden Rule: Arrange, Then Walk Away
Ok so here is the practical method that actually works. Place your shells on the backing without any glue. Move them around until you find a layout that feels balanced but not forced. Then, walk away for an hour. Go make a sandwich. Watch a show.
When you come back, look at it with fresh eyes. You will almost always spot a cluster that looks cluttered or a gap that feels wrong. This trick saves you from permanently gluing down a bad composition.
Try this general approach:
– Start with your biggest shell as the focal point, but off-center.
– Add medium shells to create a diagonal flow across the frame.
– Use the smallest stones and periwinkles to fill tiny gaps, not big empty areas.
– Leave at least one third of the frame completely empty.
– Step back and squint. If nothing pops, it is still too crowded.
Balance, Proportion, and Negative Space in Shell Art
When I say balance, I don’t mean perfect symmetry. Symmetry is boring. The right frame in the photo is a perfect example of asymmetry working beautifully. The big spiral sits on one side, while a smaller coil balances it on the other. They are offset, casual, and natural.
Think about the weight of each shell. A heavy, dark brown spiral has more visual weight than a tiny white bean shell. If you stack all the heavy pieces on one side, the frame will feel lopsided. Spread them out. Let the light, airy shells float in the open spaces.
Also, stop being afraid of empty acrylic. That empty space is not wasted. It is a visual rest stop. It gives your eye a place to breathe before it travels to the next beautiful rock or shell. That is the secret to shadow box decor that looks intentional and high-end.
High-Quality Materials Matter More Than Quantity
Here is an opinion that might ruffle some feathers: a single perfect shell is better than five mediocre ones. I have a small, perfect olive shell with a tiny natural hole in the top. It is so delicate and beautiful. On its own, it looks like a museum specimen. Placed next to five chipped mussel shells, it just looks messy.
Invest in, or hunt for, shells with clear details. Look for intact spirals, clean edges, and interesting coloration. Yes, you can buy bags of mixed shells from craft stores, but honestly, they are usually too uniform and dull. Your found treasures, scattered and imperfect, will always make better shell art.
If you must use store-bought filler shells, keep them in the background. Use the good stuff as your focal points. Quality always wins over quantity.
How to Secure Everything Without Ruining the Look
Once you are happy with the arrangement, you need to fix it in place. Do not use a glue gun straight from the tube. The strings of glue will be visible and they look terrible. Instead, use a tiny dot of E6000 adhesive on the back of each shell. Or, for a less permanent option, use museum wax.
A quick tip: if you are layering shells on top of each other, like the photo shows, glue the bottom shell to the backing first. Let it dry completely. Then glue the top shell onto the bottom one. If you try to do it all at once, everything will slide around while the glue cures.
Another sneaky trick? Use small acrylic risers or extra clear pebbles to lift a shell slightly. That creates an even deeper shadow behind it. Honestly, this little detail makes the difference between a flat craft and a dimensional piece of coastal wall decor.
Displaying Your Finished Shadow Box Decor
After all that work, do not just shove the frame on a random shelf. Consider where it will live. These shell boxes look incredible in a bathroom, where the coastal theme feels like a natural extension of the space. They also work well in a hallway grouping.
Hang them at eye level. If you are hanging two frames, like the pair in the photo, give them enough space between them so they do not compete. About four to six inches of wall between frames is a solid rule. Let the arrangement feel like a related pair, not a single giant piece.
Also, please do not hang this in direct sunlight. The shells will fade and become brittle. The dark backing or the shells themselves can also bleach, which ruins the subtle beige and brown tones that make them so pretty.
Steer Clear of These Overcrowding Mistakes
You would think the biggest mistake would be obvious, just don’t overdo it. But there are other traps people fall into.
– **The Collector’s Trap:** You feel obligated to use every shell you found on vacation. You are not. Keep the rest in a jar.
– **The Rule of Three Misunderstanding:** You think all groupings need three items. No, they need odd numbers, but that means five or seven can work too, one is also totally fine.
– **The Flat Everything Problem:** You spread every shell flat. Shells look better at slightly different angles and heights. Prop that spiral up!
Avoid those pitfalls and your work will instantly look more professional.
Hmm, one last thing. I have a weird habit of sniffing my shells before I glue them. I know, that is strange. But the ocean smell is part of the memory. Once you seal them behind glass, that scent is gone forever. So take a second to enjoy it before you close everything up. It sounds silly, but it adds a little sentiment to the project.
Building this arrangement is supposed to be relaxing, not frustrating. If you find yourself forcing a shell into a gap that is too small, stop. Just stop. Remove it, step back, and remember that a seashell shadow box is about highlighting nature, not hiding it. Give your shells some room and they will do all the heavy lifting for you.
I hope this guide helps you make a piece you are truly proud of. Now, go rescue that box of shells from under your bed and make something beautiful. Need a little more inspiration for your coastal wall decor setup? Let me know in the comments, I would love to hear how your shadow box turns out.
#seashellshadowbox #shellshadowbox #shadowboxdecor #coastalwalldecor #shellart
Leave a Comment