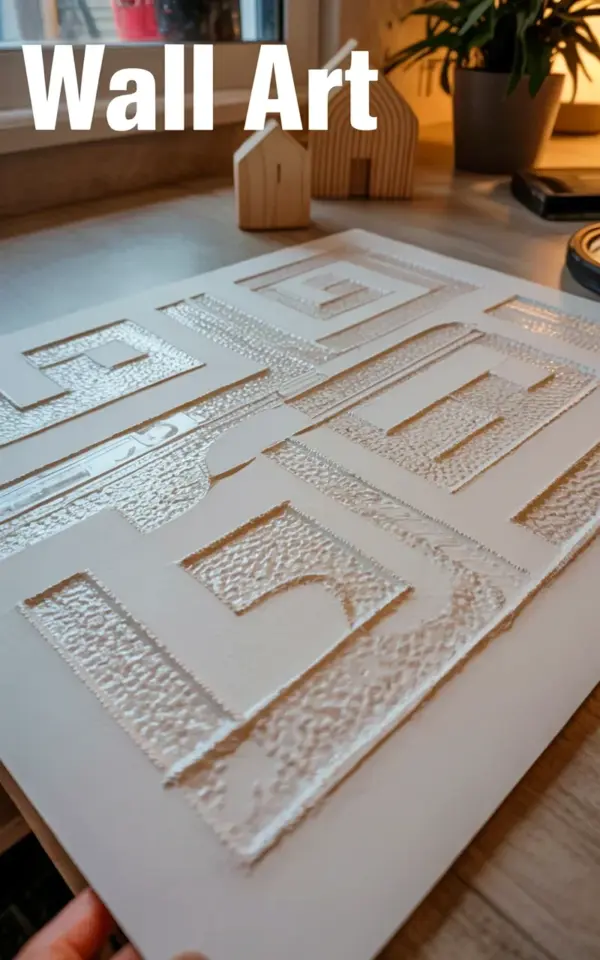
That white textured wall art DIY you spotted on Pinterest, the one with WALL ART stamped in big white letters? I made that in an afternoon. The photo was taken mid-project on my kitchen counter, with my little wooden house decor watching from the background and a potted plant trying to photobomb. It’s a close-up of the stencil pattern, all those geometric lines and shapes starting to pop off the surface.
You don’t need to be an artist for this one. I am not an artist. I’m a person who owns a palette knife, a credit card, and a stubborn streak. This project is basically paint by numbers, but with a stencil and some textured paste. And I genuinely love how it turned out.
Textured Wall Art Supplies You Probably Already Have
Before you buy anything, look around your house. I used a plain canvas from a thrift store, but you can also use a wooden board, a piece of MDF, or even thick cardboard. The surface needs to be flat and sturdy enough to hold a little bit of weight once the texture dries.
Here’s what I grabbed for this textured wall art project:
- A canvas or wood panel (mine was 18×24 inches, but any size works)
- A stencil with geometric shapes, thick lines, or a repeating pattern
- White paint (I used semi-gloss latex leftover from a trim project)
- Texture paste, joint compound, or molding paste
- A palette knife or an old credit card for spreading
- Painter’s tape
The stencil matters more than you think. I used one with circles, chevrons, and straight lines because I wanted a modern abstract feel. You can find similar stencils online for a few dollars, or cut your own from adhesive vinyl if you’re feeling brave.
How to Make Textured Wall Art With a Stencil, Step by Step
Ok so here’s the actual process, and I’m not gonna lie, the first attempt looked like scrambled eggs. The trick is to work in thin layers, not globs of paste. Start by taping your stencil flat against the canvas with painter’s tape. Press down the edges really well, especially around the cutout areas, so the paste doesn’t bleed underneath.
Mix your white paint with texture paste in a small bowl. I used about half paint, half paste, but you can adjust depending on how much texture you want. If you use straight paint, it will dry flat and look more like a print. If you use more paste, you get those soft, sculptural ridges that catch the light.
Scoop some of the mixture onto the stencil and drag your palette knife across the surface at a low angle. Imagine you’re frosting a cake and you want to leave a smooth, even layer. Don’t press too hard. Then, before the paste starts to dry, carefully peel the stencil away from the canvas. This part is the most satisfying thing ever.
Let that first layer dry completely before adding more. I added a second pass to some areas because I wanted the geometric pattern to feel more dimensional. Then I painted a thin coat of white paint over the whole thing once it was dry, just to unify the texture and make it look like one solid piece.
The Best White Paint for a Sculptural Stencil Pattern
Honestly, any white paint will do, but the finish changes the mood. Matte white hides imperfections and looks soft and earthy. Semi-gloss catches more light, which makes the texture pop. I used semi-gloss from a drawer of old paint cans, and it gave the wall art a subtle sheen that reads as almost ceramic.
You don’t have to buy expensive texture paste either. Joint compound from a hardware store works beautifully and dries hard. Or you can make your own textured paste by mixing baking soda into white paint until it thickens. That’s a trick I learned from a craft blog, and it works, but the texture is a little grainier and more fragile.
One thing I wish I’d known sooner: white paint alone won’t give you that raised, sculptural feel. You need something with body. So unless you’re using a heavy-bodied acrylic with a palette knife, add a texturizing medium. It’s the difference between a flat design and art that begs to be touched.
Stencil Art Tips for a Clean, Geometric Pattern
You already know the basics, but let me save you from the mistakes I made. First, check your stencil for rough edges or curled corners. If it doesn’t lay perfectly flat, tape it down harder or use a glass panel on top as a weight while you spread the paste.
Second, clean your stencil between passes. I didn’t, and dried chunks of paste got stuck under the next placement, leaving little bumps in parts of my pattern. It wasn’t a huge deal because I was going for texture, but it’s something to avoid if you want crisp lines.
Third, do a test piece on cardboard first. Just one small corner. That tells you how much pressure to use and how thick to mix your paste. I skipped this and spent twenty minutes scraping my first stencil clean because I pressed too hard and the paste squished out like frosting.
Another tip? Use a stencil brush or a foam brush for the paint layer after the texture dries. Dabbing gently keeps the pattern from getting muddy. And if you accidentally mess up a line, don’t panic. Add another thin layer of paste over the mistake, let it dry, and paint over it. Textured art forgives almost everything.
Easy Wall Decor Ideas for a Seasonal Refresh
This project is perfect for a seasonal refresh because it takes one afternoon and almost zero artistic skill. I made mine in the middle of spring, when I wanted the living room to feel lighter and more open. The white textured wall art brightened up a corner that used to be too plain.
You can switch up the stencil and color to match any season. Use a pale lavender or sage green for spring, a warm terracotta for fall, or a cool icy blue for winter. Or just do what I did and stay monochrome. White works all year long because it doesn’t compete with furniture or plants.
This is also the rare wall decor idea that looks good in a rental. Since it’s on a canvas or board, you can hang it with a nail, a command strip, or even prop it on a shelf. No holes in the wall, no landlord drama. That alone makes it worth the mess.
How to Hang and Style Your New Textured Wall Art
Once your art is dry, hold it up in different spots before you commit. I was going to hang mine above the sofa, but it looked better in the hallway where the afternoon sun hits the texture at an angle. That’s the kind of thing you can’t plan, you just have to move it around.
Because textured art has physical depth, it doesn’t need to be in a frame. The edges of the canvas can stay bare, or you can paint them the same white for a clean look. I left mine raw and unstained, which fits the modern, slightly industrial vibe of the room.
When you hang it, use two hooks spaced a few inches apart if the piece is heavy. Joint compound and paste can add surprising weight. Otherwise, a single picture hanger rated for the weight will do. And don’t worry about aligning it perfectly with furniture. A little asymmetry looks intentional and more human.
I also love putting it on a small easel or leaning it against the wall on a mantel. That way you can swap in other art whenever you like, and it feels less permanent. Honestly, half the charm is how it catches shadows at different times of day.
So there you go, one afternoon, a stencil, and a tub of white texture paste, that’s all you need. I want to know if you try it, especially if you come up with a better color combo than I did. Find a stencil you love, clear your kitchen counter, and make a little mess. You might surprise yourself with what you create.
Leave a Comment